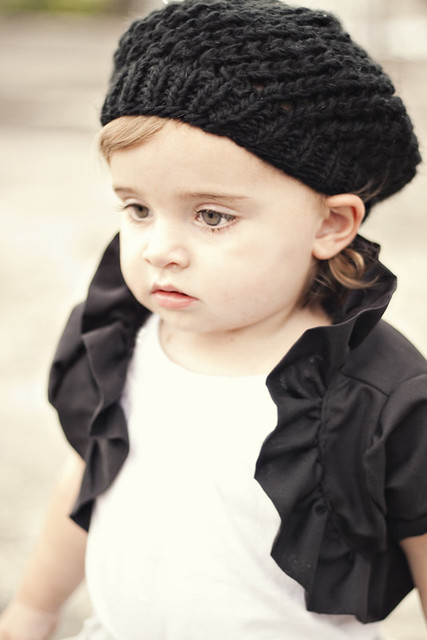
Before we jump into the bolero tutorial 2 quick things:
1. The beret I made was knitted not crocheted. I feel a little embaressed that I didn't know the difference but what can I say this was my first major project ha! The beret was the only thing I knitted, the bolero was always made out of cotton fabric so unfortunatly the few requests I have recieved for a knitted bolero pattern I won't be able to offer. I have asked my teacher if she could write down the pattern we used for the beret so we will see if she has a chance to do that for us.
2. The pattern for the Bolero is actually two pieces. I thought I had been able to fit them on one sheet but I was wrong. You can download both pattern pieces HERE.

This bolero is wonderfully easy and totally versitile. I made mine out of cotton but I am sure you could to it with a stiffer fabric like cordurouy or a soft fabric like velvet. While my ruffle stops are the arms you could make yours longer and have it go all the way around.

I think I am going to make another one in brown. They are just so fun to throw on over things.

What you need:
3/4 yard fabric
Sewing Machine
Scissors
Straight pins
Pattern found HERE
To make this tutorial easier to understand I purple fabric with white thread so you can see exactly where I sewed. My one word of advice to make this bolero cute is get perfectly matching thread. That makes it a lot more forgiving. But I think it is so much easier for you to see this way. Once you have cut out your two pattern pieces (from the papers) you are going to make a sleeve piece. I wanted to show you how I make mine and sleeves are super easy. I gave a little cheat sheet to look at:

I must admit on this one I made the edge a little long. Instead of 6 long I would do 5. But that was an easy fix. So draw up your sleeve and cut it out. Now lets cut out the fabric pieces. First the main fabric piece. The piece has a very small hem at the bottom. If you do not feel comfortable making a tiny hem just add an inch to the bottom of the pattern piece and it will make things a lot easier.

Now cut out your second piece. After making it I realized you could just as easily cut two of it instead of one on the fold and it will probably save you some fabric :)

If you do cut it on the fold, you will cut where the fold is:

You should now have these 3 pieces

Now cut 2 sleeves

Now for the ruffle. Using the remaining fabric (you may need to sew pieces end to end but don't worry you won't be able to tell when you ruffle it up) make a nice long strip. Mine was 4 inches wide. The longer your strip the tighter the ruffles.

Set your strips aside. Take your main pattern piece and your two smaller pieces. With right sides together you are going to line up the smaller end to the shoulder and the bigger end to the bottom. Pin them in place. (Sorry I spelled "shoulder" wrong in the picture oopsie)

When you are done on one side repeat on the other. Then sew them into place. Then you can hem the bottom

Now flip everything right sides out. You can topstitch the shoulders if you like. Now we are going to make our ruffle. Take your long 4 inch wide strip of fabric and:

You can now iron the fabric so that it stays nice and folded in half or you can simply fold it as you sew. Either way we are going to feed it through the machine so that a gathering stitch runs along its raw end. Once you get to the end gather it up until it is the same length as the edge of your bolero.

My bolero ruffle stops at the armpits but you can absolutely simply make a longer ruffle and have it go all the way around. I actually think this would look a little cuter ;) Once you have the length you want pin the ruffle to the raw edge of the bolero with right sides together.

Now I am not going to lie this is when a serger is really nice to have. BUT if you don't never fear. Once you have sewn around and attached the ruffle, put your sewing machine on a zig zag stitch, now change the setting so that the stitch's are shorter. Sew all the way around again and this will help contain the fray's. Once you are done flip everything right side out and topstitch what you just sewed.

Now we are going to make our sleeves. Hem up the bottom of your sleeve

Once hemmed fold the sleeve in half right sides together and sew down the ends trimming the excess

Now flip the entire thing right side out. Lining up the seams pin the sleeve to the bolero all the way around.

Now sew around the edge. You can also zig zag stitch again if you like. Repeat with the other sleeve.
Flip everything right side out and you are done!! Super easy right?

Enjoy!! Thank you for your support on Project Run and Play I really appreciate it. And your sweet comments, especially the ones that crack me up :)


Kelly thank you for writing this up. I love the bolero. It looks fabulous.
ReplyDeleteI love all the stuff you make! This is a wonderfull idea.
ReplyDeletethank you so very much for sharing this. You make incredible work, and your patterns are wonderful!
ReplyDeleteThis looks so cute and now that I've seen how you did it doesn't look as hard as I had thought. Best of luck on your next challenge
ReplyDeleteAny one know of a pattern for this in adult size?? They are so stinkin cute!
ReplyDeleteWhat size is this pattern for
ReplyDeleteI also have a question about the size. I would love to make this for my daughters (4 1/2 and 5 months), but I'm not sure how to adjust for sizing. Any tips? (theangelica@gmail.com)
ReplyDeleteThis is AMAZING! I want to make one tomorrow morning! I also was wondering what size this is for. My little girl will be wearing 18 month size by summer.
ReplyDeletekay.jennifer27@gmail.com
This comment has been removed by the author.
ReplyDeleteOnce again, you are SO cool for writing these out, especially with a pattern! I made a light pink one tonight for my little one and put the ruffle all the way around. It's a keeper!
ReplyDeleteThanks!
LOVE!!! Now all I ned is a little girl to sew for - I have 3 boys - anyone want to swap???
ReplyDeleteBTW Love that freehand font you used in some of the photos - what is that font?
Did your teacher ever give you the instructions for the knitted beret? I would love them if you have them. I think it is absolutely gorgeous.....the whole outfit, but I think the hat adds another characteristic to it! LOVE YOUR SITE! I JUST FOUND YOU AND AM SO AMAZED!
ReplyDeleteHi Kelly! I've just printed off this pattern (thank you!!!) and also wondered about what age does this fit? Thank you!
ReplyDeletewould love the beret pattern if you ever get it!!! lucky for me it's a knit not a crochet (not my strong suit!)
ReplyDeleteI am really having a hard time getting your pattern to download, media fire keeps saying error. I would LOVE to get this pattern ASAP.
ReplyDeleteThis looks sooo Cute! I'm super excited about it. I just have one question, what size does it fit? I've seen other people asking the same question, and I can't find an answer anywhere. Sorry if it says it somewhere and I just missed it, or something.
ReplyDeleteLove it!! What size is it?
ReplyDeleteVery cute, and was easy to make. Your instructions are vague at points, though. Approximate overall size would be good, too. And why wouldn't you just include the sleeve pattern? And put all the pattern pages into one pdf?
ReplyDeleteHi. Can't access the pattern pieces as it says the file is set to private. Is it still available? Would love to have it as would love it for my daughter and your tutorial is brilliant for instructions to follow it :)
ReplyDeleteI've don it! :-) Thank ou so much for this project. My niece was very happy with it and her mother much more ;-)
ReplyDeleteFor a beginning sewster it was not easy but luckely my mum could help me out. Thanks for sharing!
This is my take: http://conniesscraphoek.blogspot.nl/2014/08/fur-elise.html