Sunday, November 21, 2010

JCrew Knock Off Giveaway

In continuation of my 3 "3 dollar dresses" I made a knock off of a JCrew dress I REALLY want but refuse to pay $98 dollars for. Instead I paid three. Now granted it is not the same gingham fabric, I was lucky to find the fabric I did. I couldn't believe it when I asked if they had flannel "my fabric guy" went into the back and pulled out this blue plaid flannel. I had to Dryel it but it turned out to be really nice. WAY to thick to ever actually be worn in Timor, hence the fun giveaway. The JCrew dress looks like this:
erez-1
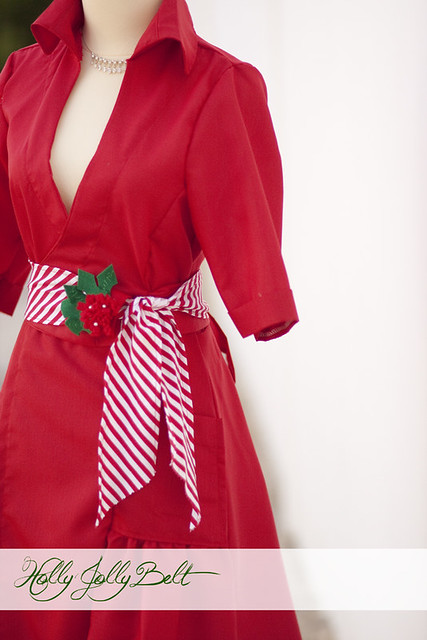
And my version looks like this:
_MG_9779_0771proof
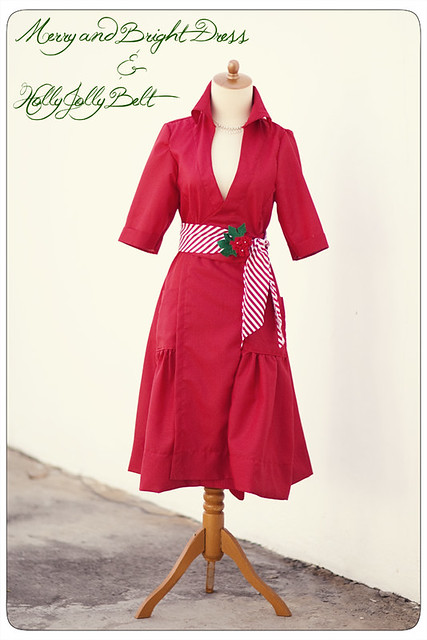
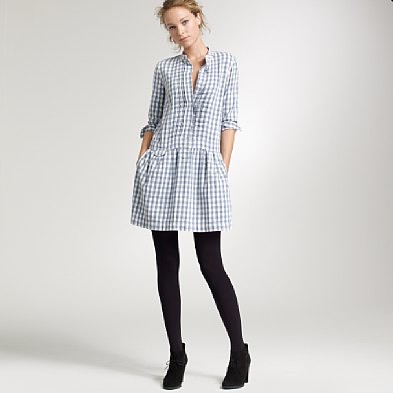
I have to say this was a challenge! I have never done oxford sleeves before let a long with out a pattern. (And of course then I rolled them up so you can't even see them DOH!)  I just kind of made the whole thing up as I went a long. I did make a patten and photoged each step so we'll see if there is interest in a tutorial. Like the JCrew dress it does have pockets, right next to my hand it this pic...
_MG_9760_0752proof
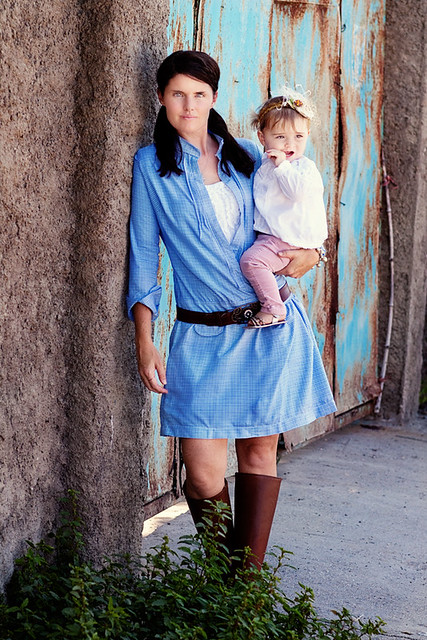
Just like the JCrew it also has a faux little pocket along the dropped waistline. Unlike the JCrew it does not have button holes up the side, it has buttons, but no button holes ha! If you win you can put those in as I have STILL not found my button hole maker. I don't think I personally would ever button it up but to each their own. I also would wear it with leggings but I nearly died from heat stroke in the flannel alone! Evie was in no mood to be put down by momma so she got to join in the fun.
_MG_9762_0754proof
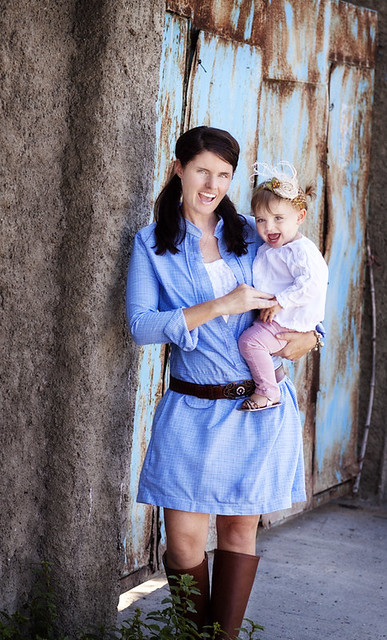
So in these pictures I look like I have the knee version of cankles... anyone know any knee slimming work outs? HA! Alright so if you would like this dress please leave a comment below. Keep in mind I am not a professional seamstress and there are probably some mistakes, oh and remember about the button holes, although I am making myself one as we speak out of light cotton and have zero intention of putting button holes so they aren't necessary.  There is a big hem so you can let it down if you are taller, again I think it would look great with leggings. (Felicity I hope you keep saying leggings in our funny voice ha!) Now it is back to cleaning and getting ready for our big dinner tomorrow night, the Ambassador is coming for dinner and I am a basket case. Guaranteed Evie is going to fling something at her, Sawyer will refuse to eat what I made and Finn will do his weird Darth Vader voice by breathing into his plastic cup, and I am going to slip under the table out of embarrassment. Wish me luck and best of it to you!

Holly Jolly Belt

 I have to apologize for the quality of the pictures lately. My camera has now completely given up the ghost. I feel like someone lopped off one of my arms. I didn't realize how major a part of my life it had become. Add into that the fact that I have only been crafting after 8Pm and well.... pictures not so good. I am hoping the Canon shop in Jakarta will fix in next week (fingers crossed, toes crossed, eyes crossed etc) Anyways it is painful for me to post pics that are substandard but what cha gunna do right? 

Moving on...Once the Merry and Bright dress was on the mannequin I thought it definitely needed something to break up all that RED. I don't know why I didn't feel this as much with the purple (speaking of which have you seen Elf? The whole time I was making that dress I was thinking "thats a very purply dress!" ha!) Anyway tangents aside I decided to make a christmas's belt, the Holly Jolly belt to be exact!
_MG_9727_0699
I grabbed a remnant of striped fabric I received a long with Sawyers birthday banner from my friend Elizabeth and finished the edges then cut the ends using pinking sheers. (I was seriously that lazy, you could totally make a nicer/ longer lasting version). I used the same flower making technique I used on the Bali Break Tunic from I Am Momma Hear Me Roar. Just like on the Bali belt I used my pinking sheers. This time I cut every other "bump"
IMG_1725_0591
IMG_1727_0593
IMG_1729_0595
IMG_1731_0597
This should say "I also added pearls to make the FLOWERS more noticeable"... this was at l1pm and my brain had decided it was done for the day!
IMG_1732_0598
_MG_9730_0702
I really do love how it turned out and love that I can slide it on and off (you know if I feel like it is over kill ha!) 
_MG_9722_0694
I might go back and hand sew veins on the other holly leaves but we'll see ;) I think minified down this could be a cute hair clip for a munchkin. Since Evie now rips out everything I currently put in her hair I don't know if it will happen ha! Hope you have a lovely weekend!

Saturday, November 20, 2010

Sewing the Merry and Bright dress and Holly Jolly belt preview :)

There are only a few hours left to vote over at Sew Much Ado for the knock off prizes... its not lookin' to good for my entries but the other ones are fantastic I don't feel all that bad :)
_MG_9725_0697
Alright so before we start sewing I want to answer a few questions posed in the comments. As for choice of fabric I would suggest a cotton. Poplin would be lovely. If you can find one with a touch of spandex for stretch that would work well (when I say a touch I really mean very little). I don't think this would work well with heavy fabrics. They way the dress is folded on each side would make sewing through the heavy fabric very hard and probably involve broken needles ha! I would die to see this dress in a stripe. (Bare in mind it is summer in my neck of the woods) a gorgeous yellow strip or turquoise... heaven! I think I am going to try and pick up some stripy fabric in Bali next week and if I am able to I will make sure to post the results. As for sizing. This pattern runs large. Sewing with 3/5 seam allowance will make this dress a large 6 or small 8. If you would like it smaller I would sew with a larger allowance and keep it standard through out. If you need it dramatically smaller or larger I would take the printed pattern pieces to a Kinkos and enlarge or shrink them. I have found that 20% seems to go up a size or down a size. If you would like a ten I would enlarge it 120% if you would like a 4 I would shrink it by 80%. It also is LONG. A nice chunky hem is what makes this dress hang so nicely. I would HIGHLY recommend ironing your hem as it has a bit of a curve to it. 
As for downloading I re uploaded the patter pieces had mentioned they had problems with and was able to download them from 3 different computers. Media Fire is not the best hosting company. I have not been overly pleased with their service but it is super cheap a month and since I don't do advertising or charge for the patterns I need to keep it cheap. 
Lets Start Sewing!!!
First you will need to make your LONG belt pieces. I did not make a pattern for these because it depends you your taste. Do you want a SUPER long belt that wraps around a bunch of times? Then do it! Do you want a thin one or a thick chunky one? All you HAVE to make sure is that one is shorter then the other as only one wraps all the way around your waist.  All you need to do to make the belts is cut a LONG piece of fabric, double as wide as you would like the end result to be. Once you have cut it fold it in half lengthwise. Sew all the way along the raw edges. You only need to "finish" one end. All I do is once I get to the opposite end then I started from, with my needle down in the fabric I lift my foot, twist the belt and sew at a sharp angle back to the folded side. Turn it right side out and you are done!

Thursday, November 18, 2010

Merry and Bright Dress: Cutting & Taping the Pattern

Alright, after lots and lots of work I am done with Merry and Bright pattern and ready to show how to cut and tape it together.
Nantucket Knock Off
Sorry it took so long but over 24 pattern pieces takes a while :) You can down load the pattern pieces HERE. If you already printed off the pattern I might encourage you to print it off again as I made some changes in an attempt to make it easier. Unfortunately I didn't fix everything so here are some house keeping items about the pattern:
There is no patten piece "Y"... I dunno how I missed it but I did 
(so any pattern piece then says tape to "Y" disregard that ha!) 

On the "O" piece it says tape to "M" that is wrong, tape it to "N"... which makes more sense anyway 

There is a pattern Piece 2, it is the back part of the bodice. You will see a pic of it soon 

There are two pattern pieces labeled W, one is just W and one is Wb. 
W is taped to V and Wb is the top of piece 13 and taped to X, Z & AA

There are 13 pieces not 14... me no count good.

If I don't go over the pattern piece here it is  because no taping is involved

Pattern Piece 1
Pattern piece 1 consists of pattern pieces E,F & G all taped together.
piece1

Pattern Piece 2
Pattern piece 2 consists of pieces C & D
piece2

Pattern Pieces 3
Pattern piece 3 consists of H,I,J, K & L
piece3

Pattern Piece 4 
pattern Piece 4 consists of pieces A & B
piece4

Pattern Piece 6
Consists of pieces N & O
piece6

Pattern Piece 10
Consists or R & S
piece10

Pattern Piece 12 
Consists of V & W
piece12

Pattern Piece 13
Consists of Wb, X, Z & AA
piece13

Pattern Piece 14
This is the biggest one and consists of: BB, CC, DD, EE, FF &GG
piece14

When all the pattern pieces are cut out it should look like this: 
allpieces

Don't mine my super dirty deck. Alright so now that yo have your pattern pieces cut out follow the cutting instructions on them. I am sure there are more mistakes I didn't catch... this has been a hard process. Lets just say if it doesn't tell you to cut 2 or more then you just cut one. Cut all those lovely pieces out and be ready to sew up a storm tomorrow! I really encourage you to make this with me I am going to try and be SUPER clear in all my instructions and there is really nothing tricky about it!

Tuesday, November 16, 2010

Winners and New Adventures

It is Tuesday night in Timor! Let the winning begin! First for the toddler Christmas ties:
Screen shot 2010-11-16 at 10.08.16 PM

holly said...

I love, love, love these. How exciting for 2 then each of my boys will have one. I am so thankful that you give patterns and tutorial because even if I don't win I still do!!!!

Yippie Holly! They will be winging your way and I hope they look sweet on your little men! 

Now for the Merry and Bright dress. Now if you don't win never fear tomorrow we will be taping together our fabric and cutting out our pattern. I am going to try REALLY hard to make this as straight forward and easy. I will be making my version in Christmas Red! The winner is...
Screen shot 2010-11-16 at 10.15.21 PM

Jessica said...

I'm thankful for people like you who help people here in the US stay grounded and remind us that there is so much more to life than the constant commercializm that surrounds us. (I'm totally jealous that you get to live in the middle of nowhere)


Jessica, thank you so much for your kind words! I wouldn't be all that jealous though ha! Today I would have killed for a candy cane... I know silly but still. Some one grab a fist full of those mini candy canes and chow down for me :) I hope you love the dress and think of me when you wear it! 

Now as for the new adventures. I will be in the states for June and July next year. During that time I would like to participate in some Bazaar type activities. I cannot open an Etsy store because you cannot use Diplomatic pouch for items that are sold, so I have to take advantage of my time at home. Remember my question about tags? Well I had so many fantastic responses thank you soooo much! I picked an Esty vendor (I really wanted to support a momma, although I think I will be eternally jealous of the awesome Tags Dana had made they are so stinkin cute!) and then I realized that I really didn't want to put "Sewing in No Mans Land" on a tag so I had a dilemma. I was going to do a contest to have some help picking a name but then I thought of one I thought might be cute but I would love to hear your opinion. I think I am going to call the clothing line I sell "Found". I like how it correlates with No Mans Land and I love the feeling of having "Found" exactly what you are looking for and totally falling in love with something. I dunno maybe it is too generic. What do you think? Would you buy a dress I designed if the price was right?


Ellie the Elf, our personal Shelf Elf

My wonderful friend Jackie is kind enough to send me fun ideas to get my creative juices going. I had mentioned talking to the boys about Santa Clause and that he is watching keeping track of good and bad choices. I joked that I could tell it was sinking in because the next day Sawyer told Finn "You cannot hit me because Santa is watching, he can even see you in TIMOR.. He's magic". Jackie told me about her families Shelf Elf tradition and I thought it was so cute! After Halloween their Elf shows up on a shelf and watch's the comings and goings in the house. Every now and then it disappears to report back to Santa. I totally needed an Elf! The only problem is that by the time ours got here it would be Christmas Eve ha! I didn't want this to stop us from having our own Santa Clause reporter so I made one myself. I scaled down the pattern from Evie's Bonjour Evette doll
IMG_1614_0508
The shrunken down pattern along with a pattern for her vest and shoes can be found HERE. You essentially follow the same instructions as with the Evette Doll so this will be a brief review and I will go over any changes I made. Once again I hand stitched her little face...
IMG_1573_0457
I cut out a shirt and pants using the body pattern. I sewed the clothes on each side first because I was afraid I wouldn't be able to sew all four layers together well but if you have the confidence go for it!! After sewing the clothes on I lined everything up and with right sides together sewed all the way around then flipped it right side out
IMG_1574_0458
I already intended to put a little belt on her but after flipping her right side out and stuffing her I noticed I would HAVE to make one ha!
IMG_1576_0460
This was the funnest part, adding the embellishments. I went with a gold belt on her tuxedo pants.
IMG_1587_0471
After making her little felt vest I added pearls for buttons, a vintage lace collar and some fluff along the bottom.
IMG_1618_0512
Of course she had to have a hat
IMG_1625_0519
But wanted it to come off because I loved her little felt piggy tails
IMG_1588_0472
Ellie is going to make her debut this weekend along with a letter from Santa explaining her duties. I snuck her up on the shelf to take a pic super quick but it just doesn't have the same feeling with out other christmas decor around.
IMG_1602_0527
We have a strict no Christmas decorations until the day after Thanksgiving... pretty sure she will look super cute once we bust it out :) Hope you can make your own shelf elf!!

Monday, November 15, 2010

Little Boys Holiday Necktie Set Giveaway

First I have to quickly mention: Two of my knockoff items became finalists over on Sew Much Ado. If you haven't checked out this blog you really should she does some Uh-Mazing tutorials. The dresses in the dress category are soooooo cool! There are two that I would LOVE to know how to make. The Yorkshire is going to get crushed but I totally don't mind because these dresses and sweaters are so cool! I would also like to know how to make ALL the necklaces in the "accessories" category. If you get a chance pop on over and see the stellar projects and if you like one cast a vote :) Now on to the give away....

I love little boys in ties. I love them in ties even more when they are in cool funky fabrics. I love them in ties EVEN MORE when they are easy to get on ha! A while back I posted a tutorial on how to make a velcro on little boys necktie. It was at the point in blogging though when I didn't know how to make digital patterns. I know my instructions for cutting the ties were not perfect so in order to facilitate a lot more tie making I made a downloadable pattern which can be found HERE. With so many fun holiday parties coming up I wanted to make sure you could easily make a tie for every occasion! So print it out and follow the same instructions from THIS tutorial and off you go! If you don't feel like sewing your own, or you want a cool presie for a friend then this is the post for you!
IMG_1608_0533
I am giving away 2 of the four holiday neck ties I made for the boys because, well, um we don't even have a reason to have them wear ONE holiday necktie let alone four ha! I do want this to get to you in time to actually be worn so this is going to be a quick giveaway.
IMG_1611_0536
The winner will be announced on Tuesday evening (our mail is going out Wednesday morning so please please please if you win contact me with your shipping address as soon as you win!)
IMG_1606_0531
All you have to do to enter is post a comment and your email (so I can bug you immediately for your mailing address). They will come all wrapped in fun holiday wrapping ready to rip open and wear or give away! Now as for the Merry and Bright dress. The pattern is now available HERE (I was in an odd mood when I made it and instead of simply calling it the purple dress files I called it "Robe Violette" which means purple dress in French.I know.... I am odd) I am going to have a FULL tutorial posted on how to tape together and cut out the pattern followed by the sewing tutorial. I know like 18 pages seems daunting but it is just because the pieces are long. You can totally do it. Just breathe. Also I would like the dress to be popped in the mail this week so I am going to cut the time by one day. I know I am awful but I kinda think all the people who are going to enter have ha! Please feel free to print out the pattern but I encourage you to wait until the tutorial to cut it out. There are some tricks wink wink.

Saturday, November 13, 2010

Raising Creative Children

I was blessed to be raised by a mother who is a very talented artist. Her medium is oils and water colors. I inherited zero drawing, painting etc. talent but she assures me that it shows through in my sewing, crafting, decorating etc. When I was young she would take me to fantastic thrift stores and let me pick out old hideous prom dresses to size down and add to my dress up box. When I wanted to wear four pairs of socks in several different colors she remarked that I was a total trendsetter. She would drive me all over Southern California for swim meets and voice competitions and would spend hours at the beach with us digging massive holes and huge sand castles. As I look back now it dawns on me how hard she worked to foster our own creativity and feed that part of our soul. When we started our family I knew I wanted to make sure my cuties had a childhood filled with opportunities for creativity.
I read Amanda Soule's The Creative Family and while I didn't adopt many of the ideas it was a great jumping off point and helped me to view the world with eyes ready for creative opportunities. I was pretty good at this in the states, the boys began to know their way around a Michael's probably a little too well :) We had parks, forests, farms etc. to explore in ample supply. When we moved here to Timor I was totally stumped. There are only so many projects I could come up with that involved shells and sand ;)
Then Sawyer's teacher Ms. Naomi (who I ADORE) introduced me to the idea of "creations". She asked parents to start saving all our recyclables, scraps of fabric, cool stones etc. We then donate them to the school and they are placed in the back corner of the room referred to as the "creation station". There is a shelf with several different kinds of tape, glue and markers. To help the children learn math and the value of money they are given fake bills when they do something good (aka sit still during book reading, help others, open doors...) they can then use this money to buy items for their "creations". They have free reign of creation station to make whatever pops into their imaginative brains. Sawyer latched onto this immediately and it is bar none the highlight of his day when he can go to creation station.
What I LOVE about it is everything he makes is 100% original. Unlike the craft packets I would get in the states that had all the little pieces you need and directions for each step (don't get me wrong these are awesome), Sawyer decides what he wants attached & where. Each day Sawyer would come home with his "creation" and be so excited to show Finn and Evie. Finn then wanted to start making creations. We decided to start keeping 2 box's in the kitchen, 1 for school creations and 1 for home use. Soon we had to transfer it to one of the cabinets outside.
_MG_9675_0242
The boys love going out and picking random items and turning them into something else. Us parents find it amusing that our children behave so that they can buy "trash" sent from home ;) This weekend Sawyer wanted to make a Wall-E and after rummaging through our supplies this is what we ended up with:
_MG_9611_0211
Finn's was a bit more abstract, since "his color" is green
walle
What adds to the fabulousness is that if they don't paint it when they are done with it and have moved on you simply pull the tape off and throw it back in the pile.
This afternoon we made daffodil's our of old egg cartons and rolled up construction paper.
_MG_9682_0440proof
I also love the feeling that we are getting every mile out of the items we purchase. I also think that Sawyer inherited my moms artistic ability. We were outside coloring with chalk on our drive way and for his age I thought his drawings were pretty great!
IMG_1368_0428proof
Finn on the other hand just likes to tell me what to draw and then add his extra embellishments.
IMG_1371_0434proof
Evie just tries to escape through our front gate.
IMG_1376_0416
In any event I just hope that I can offer my cuties as fabulously creative a childhood as I had and thought fellow mommies might need a new idea ;)


PS My mom let me know that the minute she saw the Spinning A Yarn necklace she made one for herself! This was the biggest compliment I have received in a LONG time.
Related Posts Plugin for WordPress, Blogger...