


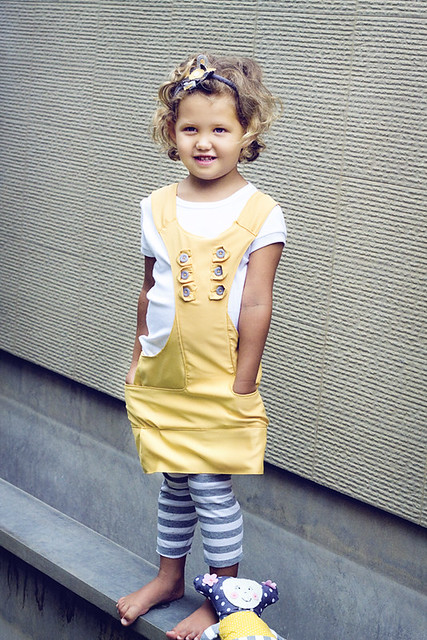
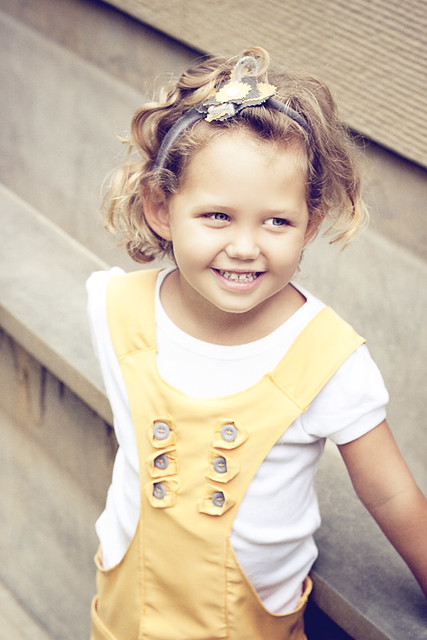
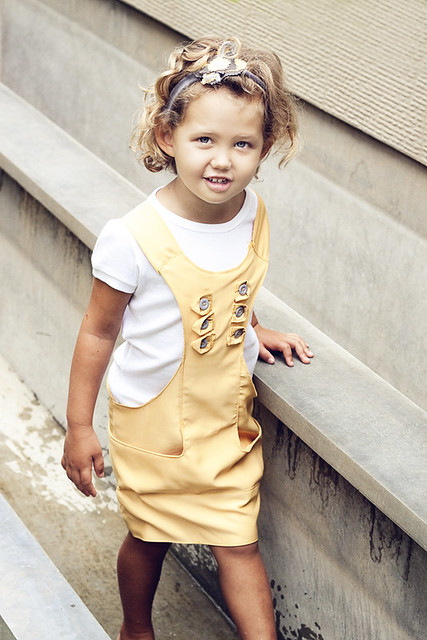
I am THRILLED to be a part of MADE's yellow celebration. I have been in heaven checking MADE everyday to see the fabulous, sunny, bright tutorials created by so many fantastic crafters and seamstresses. For my turn I was excited to have an excuse to make a pinafore I had been thinking about since returning from Rome for a little lady I know. I saw these little "military" pinafores all over the place there (or HERE at Zara) and thought "hmmm I bet I could make one" (isn't that always the way with us crafty ladies ha!) So, here it is the Happy Soldier Dress:
The pattern for the Happy Soldier pinafore can be found HERE, it is for size 4T and can easily be enlarged or reduced to meet your needs.
What you need:
2 yards fabric (I know more than usual but totally worth it) I used a suiting type material found locally of course :)
6 buttons
zipper
sewing machine
scissors (is it silly to even list these ha!)
needle and thread
iron/ironing board
Did you get the pieces all printed out and taped together? Right off the bat let me tell you that you will also need to cut a rectangle of fabric for the bottom hem. You can make this as big or small as you like depending on how long you would like the dress to be. Mine ended up being 28 inches by 9 inches. Also on your front pieces the "tail" pieces that make the pockets length is up to you. I made mine go all the way around to the back to mimic the one from Zara. Everything cut out and ready to go? Great! Take the two front pieces you cut out and lay them right sides together. Sew along the neckline. Now sew down both sides to the end of your "tail pieces" continuing down the 90 degree angle. Do not worry about sewing the bottom or the shoulder pieces at the top. Once sewn flip it right side out and top stitch the areas you just sewed.

Now you are going to do the exact same thing with your back piece. (Do not worry about sewing the sides or bottom). I put in the zipper at this point also but you can save that for later if you dread it. I usually like to put them off (I have GOT to find that zipper foot ha!)

Now take the 4 side panel pieces you cut out. We are going to do essentially the same thing with them. (Pretty redundant this pattern is huh?) Place two of the pieces right sides together. Sew along the arch. Turn right sides out and topstitch what you just sewed. Repeat on the second set of pieces.

Once you have your side panel pieces sewn, you are going to attach them to the front piece you made. Slide the longest raw edge under one side of the dress front so that it makes a nice smooth arch down. The bottom of the side panel should line up with the bottom of the front piece (or at least be close)

Once you have it in place you are going to topstitch between the two areas that are pinned in the photo. This is not very much, only about four inches. If you top stitch more you won't have little faux pockets. Repeat on the other side. Now your main piece of fabric should resemble something like this:

Grab the back piece you have prepared. Laying them right sides together line up the raw edge of the back piece with the raw edge of the side panel. (You are going to have to move your "tails" out of the way and be careful not to sew them) Once you have sewn one side open it up and topstitch what you just sewed.

Repeat on the other side. You should now have what vaguely resembles a dress with long tail things on either side

Loosely wrap your tails around to the back of your dress, lining up the bottom raw edges. To hold them in place top stitch down the ends on both sides.

Oh my goodness we are making real progress!

Now take that long strip of fabric I talked about earlier. Fold it in half and line up the short raw edges. Sew down the edge making the fabric into a circle. Now fold in half lengthwise and sew along the folded edge (this will be your hem). Now head over to the ironing table. We are going to make one of my oft used fabric strip pockets. Fold over both raw edges and iron to created a nice finished edge/ opening/pocket:

Now you are going to slide that up over the bottom of your dress, pin it in place it you need and topstitch all the way around. This can be tricky. Go slow and make sure you have all the layers nice and lined up and being sewed together. I put little pleats on either side of the front of mine (again mocking the Zara dress) but these are optional. It should now look something like this:

I just love seeing all those gorgeous finished edges with out the HUGE pain of folding and tucking and ironing etc. I am so sorry but I do not have a picture for the shoulders, it is so easy I just spaced it so no worries just read carefully. Take two of the four shoulder pieces. Place them right sides together. Sew up both sides. Turn right side out and topstitch what you just sewed. Repeat with other two shoulder pieces. Now take one of the pieces you just made. Line a raw edge up with the raw edge on the front of the dress. Sew edges together. Flip right side out and topstitch what you just sewed.

Take the other unattached side and attach it in the same manner to the raw edge of the back strap of the dress. Now repeat for the other side. Easy enough right!

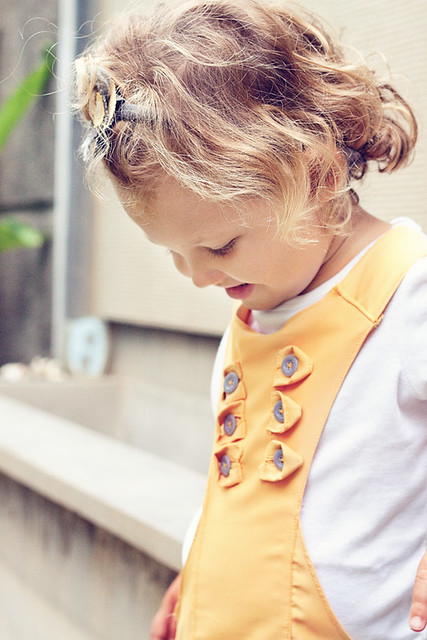
Now you have a pretty cute but kinda plain dress. We need to snazz it up a bit. That is where the military part comes into play. Take a LONG strip of fabric about 3 inches wide. You are going to fold in both raw edges (as done above) to make a nice clean edge, iron if necessary. Once you have done so you are going to topstitch all the way along the edge you just created to make a nice long piece of piping almost. Once done cut the long piece into six pieces all the same length.

These are what we will use for our military embellishment seen below:
Fold each length as shown below:

Once they are all folded line them up in the locations you desire on the front of your dress and pin. Now comes the sort of tricky part. As you attach them you will need to fold the ends under so you have a nice clean edge. Not a HUGE difficult thing, just go slow and be patient. Now you can attach your buttons underneath each "clasp".
Woo hoo! You are done! I really love how it turned out. Little Addie was such a good girl (after the tinsiest bit of coaxing and bribing.) I am always a little silly during shoots though:
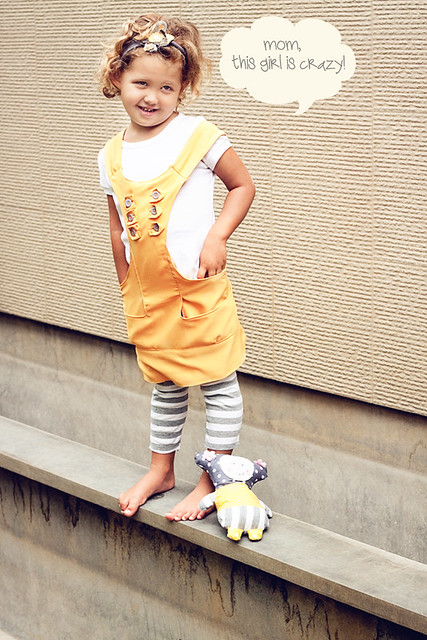
It is really different from anything I normally sew and thats what I love about it! Thank heavens I had MADE's yellow celebration to give me the kick in the bum I needed to get it done! As for the head band that is just a strip of grey jersey (from a sad sad t-shirt) hot glued to some elastic. Then I cut pieces of grey and yellow fabric willy nilly with my pinking sheers and glued them one on top of the other finishing it off with a button! I thought Addie would like playing with the softie, (I like having something in my hands when I am photographed so I am not just letting my arms hang there) She much preferred splashing around in the waterfall in her garden :)
Thankfully her mommy (who was my lovely Shabby Apple Dress model HERE) had it turned off, although the softie did go for a bit of a swim in the end.
Hope you enjoyed my Yellow contribution!
Cheers!
Kelly


wow!! I love it! And it's in my girl's size! thanks for sharing
ReplyDeleteI really love, love this! Thinking about sewing something like this for myself:)
ReplyDeleteP.S. I´m inloved with your blog
Lucija
www.ovojesivalamojamama.blogspot.com
You are a wonderful blogger. I am your newest follower!
ReplyDeletethat is the cutest freaking thing!!!! i love how you were like "i can totally do that" LOVE it! best part is, after looking at those pics i'm like "hey, even i could do that"
ReplyDeleteyou are genious!
~selina
I just found your blog and I have to say the post about those children in getting the surgeries they needed brought me to tears. Especially that adorable little boy who got his cleft palate fixed. It touched me when you were snuggling him.
ReplyDeleteCould you possibly be anymore artistic (photography, sewing)? Love it all. AND I wish I could sew. btw- If you come my direction during the holidays call me!
ReplyDeleteVery cute! I love the little buttons.
ReplyDeleteThis is so awesome! I linked to your tutorial over at Craft Gossip Sewing:
ReplyDeletehttp://sewing.craftgossip.com/tutorial-happy-soldier-jumper-dress-for-girls/2010/10/11/
--Anne
i will try it for my niece...looking smart..
ReplyDeletediscovered your blog through MADE, and I must say, it´s been a while since I´ve been so happy about finding an inspiring blogger!!!! I´ll be around often! Greetings from a fellow blogger all the way from Mexico!
ReplyDelete