


I am pretty excited about my NEXT post but I HAD to get this one up (make sure to read to the bottom to get a sneak peak of the next post). I have been talking about it forever but just kept pushing it back. I wanted to show how I make bustles on dresses. It is super easy and I think it adds something fun and out of the ordinary. Plus it gives a little cover to those booties which are often problem areas... by making it bigger... and more predominant, hmmm maybe my logic is off? Anyway I have plans to make Evie a princess dress for going to Disneyland in June and am definitely going to give it a little bustle action so it can be miniaturized if you like. Alright so first you have to know that every now and then I get a hankering to do something a bit crazy. This hankering hit last while I was visiting my wonderful friend in Jakarta. We were walking to a fabric store check and I passed this fantastic plaid silk/taffeta blend-I-don't know, that was crazy over the top. I immediately wanted to make my Shabby Apple design with it. Now keep in mind this was in November so I was in a Fallish mood (yes I am aware it is over six months later that I am getting around to photo documenting said dress ha!) This dress certainly isn't for everyone (my hubby is actually not really a fan) but I think it is fun to wear something a little crazy every now and then AND I needed to make another bustle dress so I could share with you! (Please ignore my hair in which I am obviously channeling Jane Eyre)
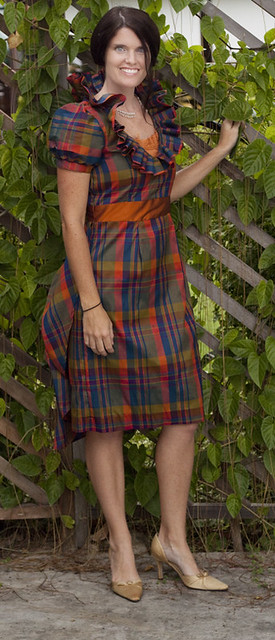 That is the front and this is the back of me... running from the camera

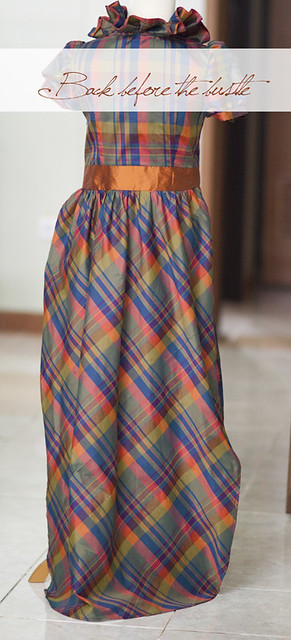
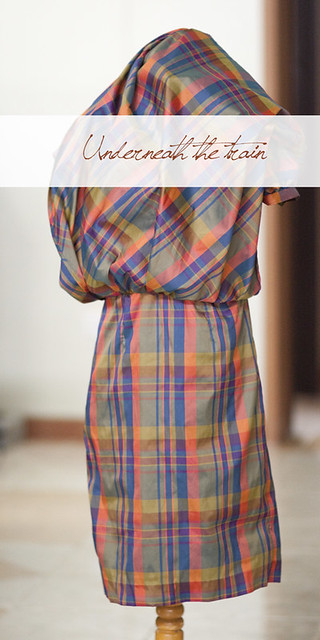

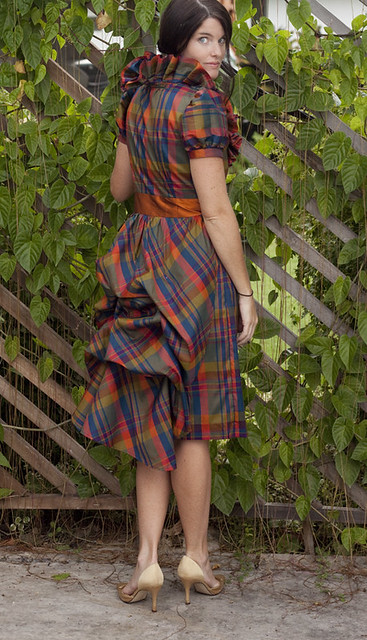


I didn't have any shoes that I loved in the closet but hey it's not like I could run to the mall so these had to do for now. Nor am I too hot on the cotton tank underneath, but again not a lot of options. Alright enough about the dress lets focus on the bustle. After constructing my dress I had a long train that was only attached at the waist. It went all the way to the floor when unbustled
The actual skirt of the dress stopped just below my knees
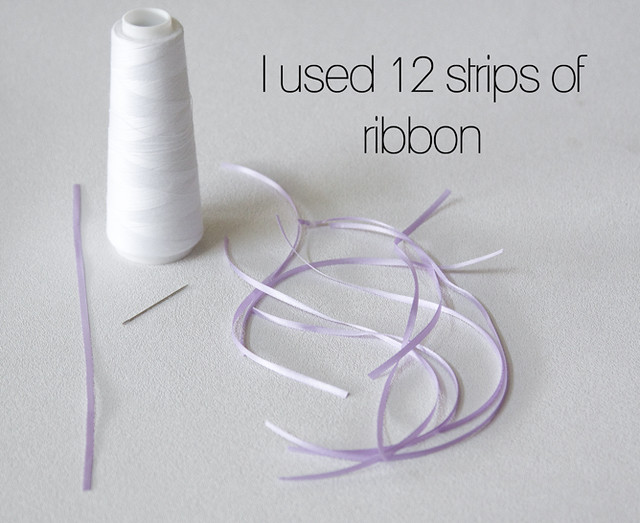
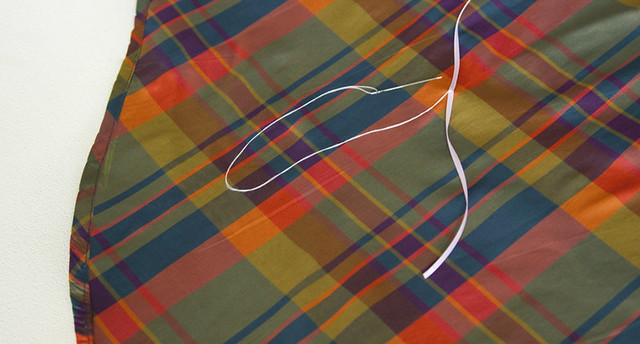
Now here is the thing. If I were in the states and could go to a fabric store I would go buy the tiny plastic rings that you use for ventian blinds. They are just tiny little plastic circles but they are wonderful. (You would use these in place of the loops I show you how to make) Since I had none I made an all ribbon bustle using thin ribbon, thread, and a needle.
We begin on the bottom on the wrong side of your train. How far up from the bottom depends on how much you want to hang down. I start on the left about five inches in. Here I fold the ribbon in half to find the center and stitch the ribbon into place at it's mid point.
I now slide about five inches to the right to the middle of the train (on the horizontal plane you should still be near the bottom of the train) and sew a second ribbon. I then slide to the far right and sew a third. You should now have a row of ribbons
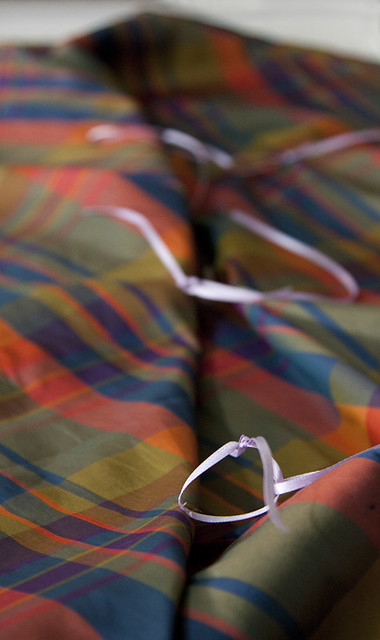
Now on to our second row. Once again you are going to sew three ribbons in place This time though the bottom half of the ribbon will be a loop with the top half left straight. Keep in mind that from now on you should stagger where you attach the ribbons. If you attach them directly above the first one you are not going to get a bustle you are going to get folds. Make one farther right or farther left and vice versa. Once you are done sewing your loop take the ribbon from the first row and pull it up through the loop and tie it in place. The tighter you tie it the more pronounce your bustle.
Now you will continue making rows of ribbons with loops on the bottom and straight portions on top all the way up to the top. For this particular bustle I did four rows of three. Just always make sure you have a tie for each loop!
After seeing this picture I actually went back and added a few extra tucks on the bottom so that it rested more evenly with the bottom of the skirt. See I told you it was soooo easy! Now go bustle a dress of yours... I just wouldn't suggest combining it with Jane Eyer hair like I did:
Do I have ears? Am I trying to keep my head warm? I dunno what I was thinking ha! Pregnancy brain right? Okay now for the fun part. I had such a great response about the butterfly headband, and so many emails with questions I thought it would be best if I just did a tutorial, and this tutorial comes with a wicked awesome giveaway. Having a hard time picking out something for your cuties to wear for Easter? Well I have some inspiration, along with a tutorial, and maybe even a giveaway!
Whats great about this teaser is you can't even see the AWESOME hairband that I am going to do a tutorial for... your just going to have to wait bowah ha ha!


Love everything about the dress! and I think you are beautiful too!!
ReplyDeleteThat's a fantastic dress, and the fabric is gorgeous! Well done!!
ReplyDeleteI am always impressed with everything you do!
ReplyDeleteMichelle
www.delicateconstruction.blogspot.com
I still just adore you. You are so inspirational, and I only hope to be this good at sewing someday
ReplyDeleteI love your creativity & style. This is a beautiful dress.
ReplyDeleteOooh! Thank you for posting this! I LOVE the bustle. :)
ReplyDeleteI love bustles so much. I love this dress so much! I love the neckline!
ReplyDeleteThat bustle is so pretty. I like your fabric choice for that dress!
ReplyDeleteFabulous! Thank you so much for sharing. I have been sooo curious about this.
ReplyDeleteI love the bustle. It looks so good and I love that dress. Your hair is cute in this photo, I didn't give it a second though (other than being cute) until you commented about it! :) Cute dress and hair!
ReplyDeleteThank you so much for sharing!! I've been wondering for awhile how you accomplished that! I absolutely LOVE the bustle!
ReplyDeleteUmm, love the dress. You are so gorgeous Kelly! And I think you're hilarious. :)
ReplyDeleteUm, love this dress and I just LOVE your blog! Your a fabulous writer, sewer, photographer.... it's so fun to read on many levels. Love love love your blog!
ReplyDeleteI LOVE that plaid! That dress is great! I wish I had a reason to wear a fancy dress...but things don't come up in Idaho very often!
ReplyDeleteI adore that fabric. It's just gorgeous. The overall dress is a bit over-the-top for my tastes, my since that's what you were going for, it turned out perfectly. Is this how wedding dresses are bustled?
ReplyDeleteSo I have followed your blog for awhile now and it wasn't until this post that I saw the last picture of you and thought... I know her! Not like, blog world know her.. but really know her. I have dug into my memory bank... aka, pathetic memory, and I am not sure... maybe high school. But I know nothing about where you are from, but I have made the connection that you are LDS. Perhaps It'll come to me sometime.
ReplyDeleteAnd until then, I will continue enjoying all your amazing skills and foreign service adventures.
Megan (Lloyd) Taylor