


First I want to say the biggest hugest most ginormous-est (yes its a word... or it should be) thank you to Kari at U Create. Thank you Thank you! Next let me say an equally as big thank you to new readers who are kind enough to give me a chance to share some of my fun (sometimes funny looking) sewing tutorials. I know this is a tough "blogging market" and I didn't even expect to be noticed by anyone, so thank you for giving me a chance. Next thank you to those who would even offer to send me a scrap of fabric. Wow, if you want to wonder the state of mankind just check out how many dear hearts have already asked how to send some. I will take whatever you deem worthy to shove in an envelope. I don't care if it half of a fat quarter if you are kind enough to send it, I will TOTALLY find a use for it! I love a challenge (obviously haa!) Please don't feel like this is something necessary to take part in this blog. My main goal is still to see how many things I can create (that are still cute) with as little expensive fabric as possible. I know that these days money is tight in most families so my hope was to show that awesome little outfits can be made on small budgets if you just get creative! I truly believe the key to making your own patterns is to be fearless. Sewing is sooooo forgiving, if you mess up you just unpick it. If it turns out hideous you cut it up and use it as something else or at least get a good laugh out of it. Don't worry about imperfections. If someone is that close to the clothes you make I am guessing they are someone who cares about you and looks for the best, not the flaws. Be fearless with me and I promise you will be glad you were! So lets do this thing! Speaking of budgets (ummmm earlier) do you love Shabby Apple? I love love love them, most of the time. I was a little concerned when their carousel line came out but they seem to have turned it around (no offense if you love that line I am just a plane jane girl myself). Well, their baby line has some adorable outfits, THIS one in particular. I have made a "knock off" shabby before for Sawyer's betrothed Lucy (whom I ADORE) and thought why not give this one a go. And believe me you can TOTALLY do it!
What you need:
Not even a half a yard of fabric if it is home decor and 60 wide instead of 40. If it is 40 wide you probably need 1/2 a yard. This is for a one year old, you will need more as you go up in age. (I know duh right, but just covering my bases)
One little rectangle of fabric you want to use as the pouch
Thread
Scissors
Pins
Paper for making your pattern
1/2 yard elastic
Safety Pin
I made this dress to the Carbon Leaf CD, so mellow, so chill if you haven't heard of them you should check them out (if you like blue grass at all)
I made a few mistakes making this dress and I am happy to make sure you don't make the same. First we need to make our pattern. Grab some paper and possibly one of your little girls dresses just as a rough guide for the length you are going for. First we are going to draw the sleeves. Cut a rather large rectangle to begin. Fold it in half. Draw a nice slope from the top to the side, then draw straight down about an inch and a half

Pardon my shell paper weight. The curved part is where you are going to connect the sleeve to the dress and the straight part where you are going to make the sleeve gathered (but we will get to that later) The reason I want to cut the sleeve first is then I can use it as a guide for my main dress. Grab another piece of paper and again fold it in half. Free hand a scoop neck, now take your folded sleeve piece and flip it so the the slope can be used as the template for the armhole (the folded part of your sleeve should be parallel to the fold in your dress pattern). That way they match up perfectly. Then draw down the length you would like. I wanted mine to bell out a tad, but that is totally optional:

Word of warning: I did not make my little shoulder piece large enough. Make a wider strap, you can always make it smaller.

Now that you have your pattern pieces go a head and cut out two of everything. Now for the super cool sneaky peaky part. Find the fabric you set a side for the pouch on the front. I was totally bummed at first because all I could find was this tealish color.

I though "aw man so close but so far away". Then I remembered my super secret stash that is locked in our hall closest and crossed my fingers. Woo hoo! I found this blue:

Sure it isn't as cute as the Amy Butler Polka dot but at least it matched :) Now for the sneaky part. The little pouch on the front of the dress is almost EXACTLY the pattern piece you used for the sleeve! I decided to make mine a little smaller by simply folding over some in the middle

At this point you should have five pieces, 2 sleeves and a pouch

And two dress pieces

I think it is easier to sew the pouch on now when you are just dealing with two pieces of fabric. First I finished the slope portions. This can be a little tricky so sew slowly.

I went a head and pressed the top, little straight portion below the slope, and bottom of the pouch. This makes it a ton easier to attach. Pin the pouch where you would like it.

Now you are going to top stitch it on. Do not sew the slope portion. That is where your bubs can put all their little treasures. I started just below the right slope and sewed around until the bottom of the left slope. Be sure to back and forth at both the start and finish as these will be pulled on when things are going in and out of the pocket.

I just want to make sure our beginning sewers know that at corners you simply make sure your needle is down in the fabric (as pictured above). You then lift your foot and swing the fabric to the side you want to sew on next, re-engage the foot and begin sewing. I know most advance sewers know this simple step but I remember when I learned to do corners it was like being liberated ha! Go a head and top stitch across the top and voila you have a pouch. Set a side the front of your dress and pick up the back piece. We want you to be able to slip the dress on and off with out getting heads stuck so we are going to make a simple little slit and closure. Find the middle of the back if the dress. Cut a 2 inch slit right down the middle. Now turn each side so that they are finished and pin

Grab a little piece of your elastic and make a loop placing it under the finished portion.

I apologize profusely for the state of my hands... wow if you were judging my age by them you would think I was ancient, yuk. Okay once you have regained composure from my hideous fingers, double your loop back over the top of the fold

No top stitch all the way around, making sure to remove pins as you go. Also be sure to leave a nice little space at the top so that you can finish the neck nicely. Go a head and finish the necks on both the front and back of the dress.

Now you can pick a button and sew it opposite your elastic. Then when your dress is closed it will look like this:

Ohhh so pretty. Now for and easy part. Place the dress pieces right side together and sew up the sides and also at the shoulder pieces. Keep your dress inside out but lay it to the side. Grab your sleeve pieces and shirr them up leaving the straight portion alone and as always leaving tales to allow for adjustment.

Now you are going to pin the gathered sleeve, right sides together, to the dress adjusting to fit. Once you have it all pinned sew around again leaving the straight portion at the bottom of the sleeve unattached. (sorry for the bad picture on this one)

When you are done it should look like this:

Now you are going to make a hem or pocket for the elastic at the bottom of the sleeve where the straight portion is.

Once you have sewn it down and made a pocket. Cut a length of elastic. I totally guestimate on this because you can shorten it once you have feed it through. Attach it to a safety pin and feed it through the pocket you created. Pin both ends together and spread out the gathering to make sure you have the right side. Cut some elastic if you need to. Then sew the two pieces of elastic together. I just back and forth over and over and over. Cut off any excess and let it slip up into the pocket. Sew up the little opening and voila!!! You are almost done. all you have to do now is hem it to your liking.

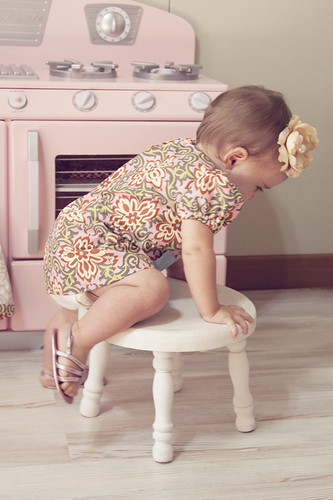
Evie liked it because it matched the apron and oven mits that are in her play kitchen.
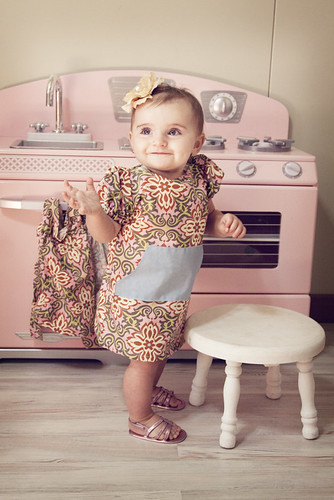
Okay so she really didn't say anything about it but she did like that she could still crawl up onto her stool in it!
So there you have it. Shabby Apple at less then 1/3 the cost, or more! Think of all the fun changes you could make or color palettes you could use. Oh also, if you ever would like to use any of the pictures from my tutorials let me know and I can send you a better resolution. The ones I post are at 20% because our internet is sooooo soooo slooooowwwww. I am grateful to have it at all and shrinking the pictures if the only remedy I have found. Hope yours looks as adorable on your baby girl as I think it does on Genevieve
Cheers
Kelly
PS I am so ridiculously excited for the next project, I could not sleep at all last night because I was sewing it in my head! Think super cute knickerbockers for baby girl or boy!


Hello from Crystal an RMO's wife in Kuwait! Your blog is so neat what a cool idea : ) I can't wait to follow along with you in your adventure. We are new to the State Dept. and at our first post in Kuwait City. I have just started knitting and am addicted to it. It is almost impossible to find yarn in Kuwait. Can you find yarn? I'll make you a deal I will send you fabric if you send me yarn? I have an APO address do you? If you have a minute can you email me? My blog is http://thebridenbunch.blogspot.com
ReplyDeleteI am serious about the yarn if you can get it I'll trade with all the amazing fabric we have at our markets here. Blessings to you~ Crystal
love it! love the blog! Trying to keep my sewing as a fun hobby that costs nothing I have to use things I have on hand...and they're not pretty. I love that your blog eliminates all the unneeded things and just creates a simple beautiful design. could we have some little boy things too? All these posts make me want a little girl so bad. I have two rough and tumblers. I'd love to see what you come up with for them!
ReplyDeleteStumbled across your blog from U Create. That is an awesome challenge you are doing. I thrive on being thrify, and it is so much fun sometimes to see what you can do with a limited amount of supplies. I'm doing a giveaway on my tiny little blog this week. www.beckyanndesigns.blogspot.com. Hope you will come enter!
ReplyDeleteI love this! and how cute is Abby in her little kitchen! I can believe it! That everyone will be sending you fabric! only because they want to see what you'll come up with ;) magnificent! And thank you for coming by Kreative Knack! Love having you!
ReplyDeleteLove it! Love love love Shabby Apple! I liked their carrousel line but it is was a bit loud for my taste....
ReplyDeleteAbby is so cute, we've got the same little kitchen here! Don't the girls just love little kitchens?!
I love your new little blog... and the first thing I thought when I read it was I MUST send you some fabric... please message me and let me know how it can be done... Have a great day and keep blogging!
ReplyDeleteHi Kelly, I'm Staci from Justsewsassy.com
ReplyDeleteI found you through Kari at Ucreate, and I just think you are amazing!! I LOVE this tutorial and all your others as well. I'm your newest follower, and can't wait to see more of your fun projects in the future;)
This is SOOOOoo cute!
ReplyDeleteAlso, do you have an address we can send fabric to? I have some great scraps I'd love to send to you!
Just kidding...I see the address!
ReplyDeleteCute Cute!!! Just like normal!!! I am loving all your ideas! Can't wait to see some of the little boy sewing projects!!!
ReplyDeleteLove the blog! Found you thru uCreate. I see your address but is that the whole address? What about last name?
ReplyDeletethanks!
Love the Fabric and the blue pocket in the middle! So glad I found you.
ReplyDeleteI just think you're amazing.
ReplyDeleteI also give a ginormous-est thank you to you for sharing your great ideas even under not-so-easy-to-create circumstances!!
I ADORE this dress. she is sweet as cream in it also! I'm going to need to fix my machine....
ReplyDelete