


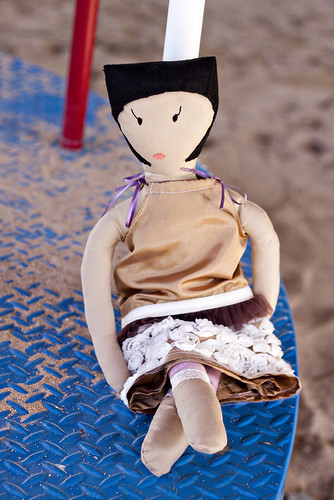
Did you watch the video? Were you as completely smitten as I was? Oh my gosh I am so in love with the Kiki and Coco dolls. We are heading to Rome and Egypt in a few weeks and I thought wow, I really want to imitate this with Evie. The dolls can be found HERE at Tiny Concept, an Australian based handmade toy company. I am crazy about their dolls but no way I could afford the price. So, where did that leave me? Oh yah! Totally psyched to make my own. I have been wanting to make Evie something she can keep forever, clothes, bows etc only last so long. This was the perfect inspiration for me and I thought maybe other mommies would like to make one for their darlings, so here you are mes amies, I present The Bonjour Evette Doll. Pattern found HERE
What you need:
Print our the Evette pattern
Scissors
Muslin, Linen or fabric of your choice for her body
A felt Square in the color of your choice for her hair
Thread of your choice color for her eyes
Pink thread for her mouth
Square of fabric for the Pantaloons
Length of lace or other embellishment for around her pantaloons
Fabric to make a mini-pillow case dress
Lots of fun embellishment fabrics, ribbons, fringes etc
Ribbon to tie up dress
Stuffing/ Fluff
Sewing machine
Needle
Patience HA!
Turn on Sabrina and lets get going!
Once you have al your pieces cut out grab your needle and thread for the eyes. Before I started sewing I took a pen and drew the eyes on so I would have a guide

I then took black thread and hand sewed her eyes. I started at the bottom and made my stitches progressively bigger. One word of advice: If you want it to look nice and smooth without any gaps, start your next stitch inside your last stitch. Once I was done with her eyes I went on to her mouth. I wanted it to be a little pouty with nice little peaks. I drew an outline with a pen and then followed that outline with salmon colored thread. Then I went back and filled it in.

You could make both things bigger but I kinda like them small compared to her head :) Now it is time to make her pantaloons. I wanted to keep everything rather muted so I got a muted pink as opposed the the awesome electric pink ones coco and kiki had. Grab one of your cut pieces and pin it to her legs, folding over the top all the way across and the bottoms of each leg (do not worry about sides)

Now sew all the way around making sure the edges are tucked under. Now repeat with the other leg. I decided to edge mine with some of my balinese lace by tucking the raw edge under and attaching a little strip on each leg (4 strips will be used total). Once this is done it is time to sew up Evette! Place your doll right sides together making sure to line up all the little corners etc. I set my sewing machine on a tighter smaller stitch because I didn't want to break the seams when stuffing her, plus it just makes everything stay together well over the years. No popped seams etc. I decided it would be easiest to leave an opening at the top of her head since I would be covering that part up with hair anyway. I made sure to reinforce where I stopped by "back and forthing" several times. Once you are done flip Evette right side out

Make sure all her seams are nice and night before you start stuffing her. I also used my seam ripper to retrieve any end points on the arms or legs that were stuck up in there. If everything looks good grab your fluff and begin to stuff. I used small chunks of fluff so that it would be even and it is a lot easier on the doll. I used a ruler to shove the fluff down into her legs and a pen to shove it into her arms. Then I went a head and stuffed her trunk and head.

(okay at this point it was about 1 am and I was laughing too hard at the fluff coming out of her head, I was totally getting a bit punchy). Pack lots of the fluff down into her head because you need it to be away from the seam you are going to sew but don't want it to be flat once you are done sewing. Topstitch Evette's head shut and rearrange the fluff. Now it is time to give her a weave hee hee. I was hesitant to include the template for her hair because I basically just wrapped felt around it and then cut and folded it until it was the way I like. But I thought someone might really need a "guide", please only use it as such and don't hate me if it is really hard to work with.

See how it is sort of a square a the top? That is a flap the folds over and covers the rest of the fabric all folded underneath. Just make sure the straight portion of the template is in the back and comes up to the points. Then make a nice curve with the rest. I wish I could include a video but I am going to have to leave you on your own for this one, so sorry. Once you have it all arranged and pinned you are going to topstitch everything down. I did all around the front, up at the squared off portion, and then the bottom in the back folding down and sewing a little pleat to make it lay flat. Woo hooo! She's getting pretty cute huh? Now we need to make her a dress. All her dress is, is a minified pillowcase dress. I didn't bother doing a walk through for this part because there are a BAGILLION tutorials for pillowcase dresses, if you google it you can find tons that will work just fine. All I did was measure across Evette's shoulder area and then down to where I wanted the dress to be. I believe it ended up being 6 inches across (so that it bunches nicely) and down 13? But don't quote me, simply measure your dolly. The important part is adding embellishments. I found this amazing, fantastic rosette embellishment here locally and was in LOVE. The guy cutting kept reminding me that it was 4 dollars a meter. I kept saying "yes but it is gorgeous" it was hilarious. (That is considered VERY expensive here).

I attached it to the bottom of the dress all the way around. Then I wanted some ruffles so I grabbed some of my brown nylon chiffon (have you heard of this wonder fabric? It is so soft and gorgeous and doesn't fray AT ALL! It is what pettiskirts are made out of. Do you guys want a tutorial on Pettiskirts? I have made over 50 so I consider myself well qualified ha!) I gathered it all up so it was a nice thick ruffle and attached it just above the rosettes. For the last part I took some binding tap and sewed it right at the edge of the nylon chiffon. I was going to go further and add some braided stuff but thought, you know some times simpler is better, so I left it. I couldn't find any thin brown ribbon, bummers, so I had to use this mauve color. I would sew the bows down (to avoid choking, strangling, what have you) but I really want to switch it to brown. Once your dress is all done slip it on, tie the bows, sew them so they remain tied (but not to Evette so if you like you can change her dress) and voila, un belle Poupée
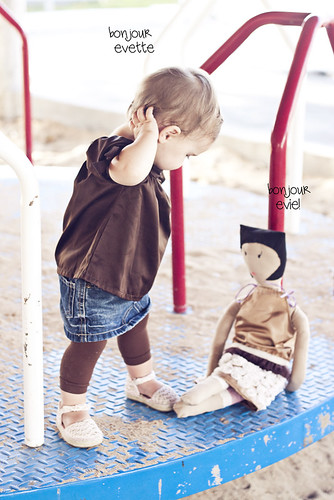
Evie loves her already I can tell. She dragged her around this morning (thankfully the floors were clean) and "eh eh'd" for her to come to the park. Probably because except for the explosion of pink that is her room, this is the only girly thing we have ha! I think they are going to be friends for life. And, lucky Evette gets to see the world with us!
Cheers!
Kelly


I can't wait to make some of these. I have little girls who come to my house all of the time and need something to play with. I love this idea!
ReplyDeletetoo cute!! Adorable! oh and yes i'd love for you to make a tutorial on pettiskirts! please oh please!
ReplyDeleteI love this! And I really really love all your ideas!
ReplyDeleteSo pretty. It reminds me of one I started for Gwyneth but didn't finish because the hair instructions were too difficult. The way you did her hair for this looks so cute and looks a little bit easier. Thanks Kelly!
ReplyDeleteCute doll. I just love the outfit your little one is wearing. So cute!
ReplyDeleteFabulous! As my daughter would say~ that doll has great fashioin.
ReplyDeletelove this. I want to make one!!!!
ReplyDelete