


Quick reminder that the To The Line Knock off pattern is available to print HERE on my Scribd shalf.
I should mention that if made as is would result in a dress sized "4".
I think the majority of people who have asked me questions about making patterns have asked how I make my patterns digital. For a while I didn't really want to share this info because I felt like it set my blog apart, having digital ie. not hand drawn, patterns. But I feel like that is a little lame and selfish of me. This method of making your pattern I just made up after fumbling around with photoshop for a few days. It does rely almost completely on Photoshop or Photoshop elements.

I have no idea how you would go about doing this without several of the elements that these programs offer. If you do not have either of these programs I would highly suggest looking into Photoshop Elements. It is a great entry level editing software that is SOOOO user friendly. There are some aspects of Photoshop elements that I wish Photoshop CS would adopt ha! It is much more affordable and you can see if you will use it enough to make the plunge to a Photoshop Suite! I also thought it would be helpful to have a reference with all the steps so you could simply print it out and have it next to you while you are trying to master the process. You can find the step by step printable HERE on my scribd shelf. Please note that this is not to be reproduced in any form without my WRITEN consent.
Lets get digitizing!!!
The first step is to scan all your pattern pieces into your computer so you have them available as "digital files" to work with. At this point it doesn't really matter their format. My scanner automatically transfers them to Adobe files and emails them to me. Jpegs will work perfect as well though. at this point, for organizations sake, I create a folder on my desktop for this particular pattern. In the end you will be left with two copies of each pattern page so it is nice to be able to save them all in one specified location, otherwise you will have a mess of documents all across your desk top ha! Again this is personal preference :) Once you have scanned all your documents open Photoshop.
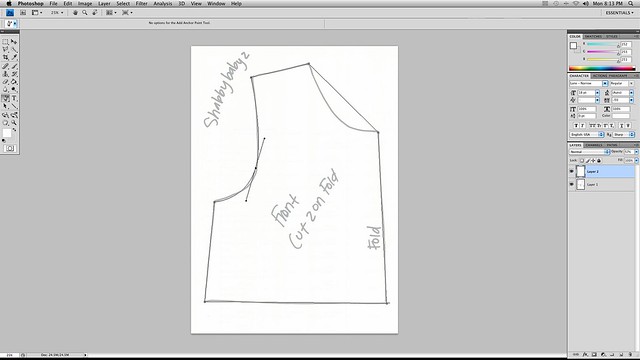
Open one of the pages of your patterns (I tired to use one that was not to complex but covered all the steps)

Create a new layer by going to the "layer" tab at the top of the screen and selecting "New"

A dialogue box will pop up, just hit "yes" unless you are crazy fastidious and want to name your layer.

Select the paint bucket tool making the color white.

Paint the new layer entirely white by clicking anywhere on the new layer you just created

Go over to your white layer and reduce the opacity so you can see your pattern underneath.

Select your Pen tool (either manually or just push "p" on your keyboard)

Start at one end of your pattern piece and "click", go to the next corner and click again, a line will be drawn.

Right click on the pen tool and select the "adjust" pen tool. Click in the middle of lines that need to be bent. 3 dots should appear. Pull the center one in what ever direction you need the line to bend. You can also slide it up and down.
When you are done click on any other lines you need bending and do the same.

Once you have the outline the way you want right click in the center of your pattern and select "Define area"


This should turn the line into dots and make it sort of flash.

Select the paint bucket again only this time in a light gray. Click in the middle of the pattern.

Now using your text tool write all the text you need to in the various places.

Once you are done select your original layer.

Click the eye so that this layer is no longer visible.

Now you are going to flatten your image

When it asks you to discard hidden layers hit OK

You will now have your finished pattern piece!! I then save the pattern piece as a jpeg in the folder I designated. Now they are all in JPEG form. I prefer them in Adobe form though. I don't know if this is a MAC thing (the only comp. I have done this on) but when I go into the folder and open each jpeg I can then re-save it as an adobe doc. thus having two copies of each pattern piece. Adobe docs upload much faster to most hosting sites and are compatible across the board. So that is my method! I hope it is straight forward and helpful and fingers crossed makes more websites offering digital files. Of course my dream is that people would offer them for free but maybe that will remain a dream ha! Good luck!!!


If you are looking for a free alternative to Photoshop or Illustrator, try GIMP or InkSkape. They are available here http://portableapps.com/apps/graphics_pictures
ReplyDeleteThey have all the same functionalities.
Here is some additional information on digital pattern drafting that I found very useful
http://bombardone.com/sewingprincess/2010/08/drafting-patterns-with-illustrator-and-printing-patterns-at-home-on-a4/
I wonder if I can get photoshop to sponsor my blog and give me free software...*sigh, great tute. Bookmarked it for.....someday :)
ReplyDeleteGreat job! Very easy to follow. I checked and you can do the same thing in Piknik (for the $3 per month upgrade). I don't have a pattern I need to upload but I will be able to when and if I ever need it!
ReplyDeleteThis is great! I've been wanting to add (in the near future) patterns to my shop and blog, but hadn't figured out how to make them digital yet. I'm wondering how to deal with pattern pieces that span more space than the scanner allows for? Scan as multiple pieces and have the person tape them together after they print and cut out the pieces?
ReplyDeleteAlso, I've very recently started using GIMP (since I don't have the $$ to pay for Photoshop I needed a free alternative). It seems to do all the same stuff that Photoshop says it does, so I think I'll figure out how to do this using it!
my way of having a pattern made is having my husband do it! ;)
ReplyDeleteYou are so kind to show us how to do this. The thing that sets your blog apart is that you are incredibly talented and so generous with all that you give us! Thank you for spending so much time to show us even with small children and in the middle of a move and preggo. Man you sure are superwoman!
ReplyDeleteYou just saved me weeks of frustration... I don't how I can thank you!! Thank you, Thank you!!
ReplyDeleteLOVE it!!
ReplyDeleteYou can also do this with Paint.Net which is free:) I have Photoshop, but quite often use Paint.Net instead b/c it doesn't bog my computer down. It's a bit more user friendly too for a beginner
ReplyDeleteYou are a life saver! I have been racking my brains trying to figure out how to do this without expensive software (I already have photoshop)! Thanks for sharing your secrets! It made my day!
ReplyDeleteThank you for sharing your process & thank you for your honesty. I get "selfish" too about my creativity, sometimes. Nice to know other adults out there behave like children sometimes too. (& then grow out of it, thank goodness. ;))
ReplyDeletePhotoshop Elements doesn't have a pen tool...just learned that the hard way :(
ReplyDeleteI love photoshop and this is so simple its silly I never really thought of it before. Thank you so much!!
ReplyDeleteThankyou so much! You are such a talented lady - I'm so excited to get started.
ReplyDeleteI've been looking for something like this. Thanks so much.
ReplyDelete