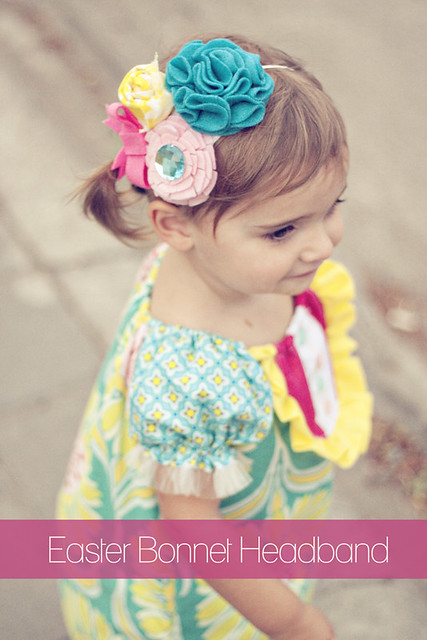
I am pretty excited about this post. Mainly because I don't really want to give this outfit away which means it is pretty cute right? Also, I received so many comments and emails about Evies headband with her Butterfly Dress that I thought I could share a step by step on how I made the Easter Bonnet Headband so you can make one for your own cutie. When I was younger I LOVED over the top hats so I reveled in the opportunity to wear one to church on Easter, my own Easter Bonnet. Since I couldn't find one I loved for Evie I thought instead I could make her a headband that was as bright and cheerful as an Easter bonnet:
This also gave me an excuse to get the boys gussied up in their Easter outfits and do a mini photoshoot.
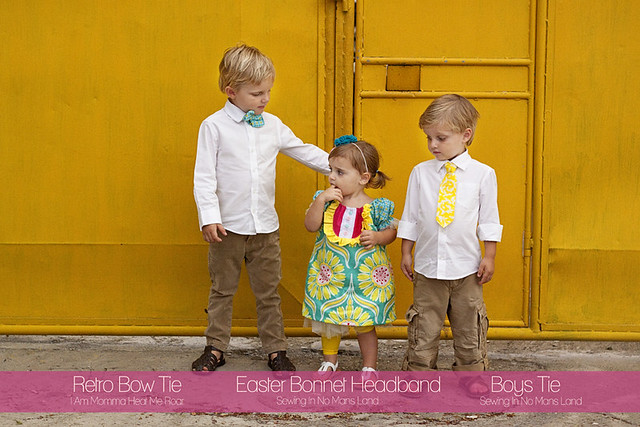
I literally thought of this at 4pm and ran around like a crazy women so the chillins were feed, dressed and ready to go when Daddy got home at 5:30. That even meant making Sawyer a bow tie!
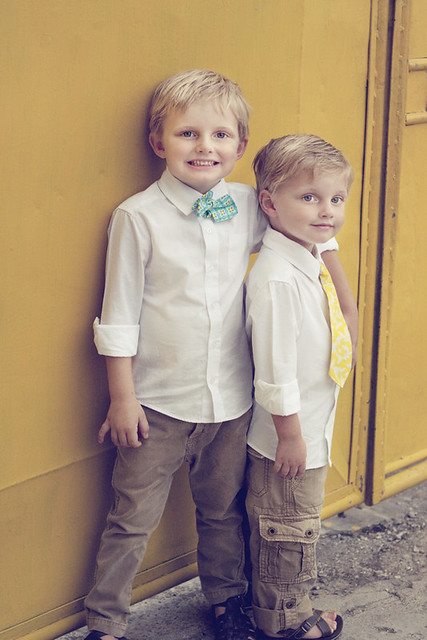
I used Cheri's retro pointed bow tie pattern from I am Mama Hear Me Roar. It was ridiculously easy to sew and took me no more then ten minutes once I had it cut out (which took about 2 ha!) I had the dickens of a time tying it though but I think that is mainly due to my inability to EVER learn how to even tie a tie let a lone a bow tie. Liam's tie is actually a hand me down that I made Sawyer and is comically WAY to small. You can find the pattern and tutorial HERE by yours truely although I am going to be making a next size up pattern pretty soon :)
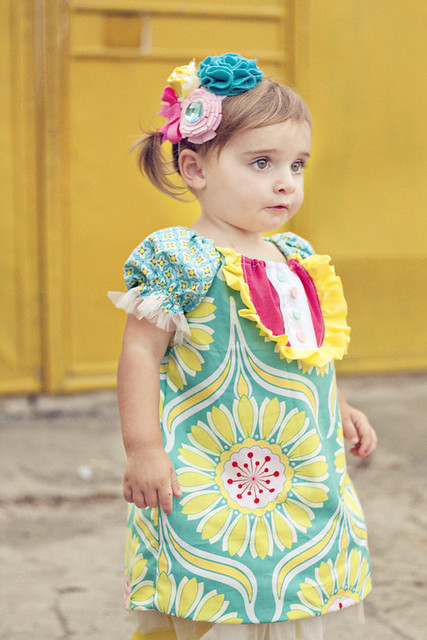
Evie's dress will also go to the winner of the giveaway (details at the start of the tute). It was my original creation for the week in Project Run And Play where we fiddled with the Sweet Dress pattern. I loved it but it wasn't over the top enough for me, super cute but rather unoriginal. So, I set it aside and came up with the Couture Cutie or Mullet dress.
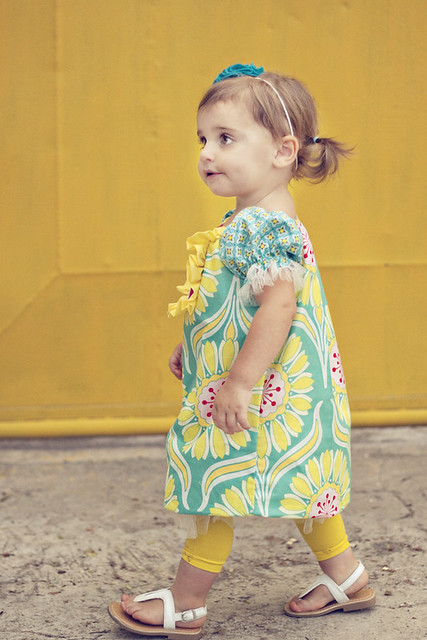
This little number ended up making it to the darkness that is Evie's dress closet and was not retrieved until this photoshoot. We just don't have opportunities to put dresses like this on her so I thought it should go to a good home where it will get worn! Her leggings are of course from We Love Colors. Oh and I totally forgot to mention last time (and received a few inquires about it) Evie's shoes, both the gold pair from before and this white pair are from Target online. I got them for a steal of deal: $2.30!!! I even ended up ordering some extra pairs for other little girls on the island ha! Okay enough about the clothes on to give away details and the tute.
Give Away Rules:
Leave a separate comment for each please:
You can be entered once by leaving a comment
A second time but posting about it on Facebook
But you MUST be willing to check back to see if you won by Saturday night USA time. I am currently in Singapore and want to get this in the mail while I am here so it will get to you lickety split as opposed to the over six weeks it would usually take. That means I HAVE to have your address by Saturday evening USA time so I can get the package in the mail on Monday morning my time. Yup, that means this is a super fast giveaway.
Now on to the Tute!!!
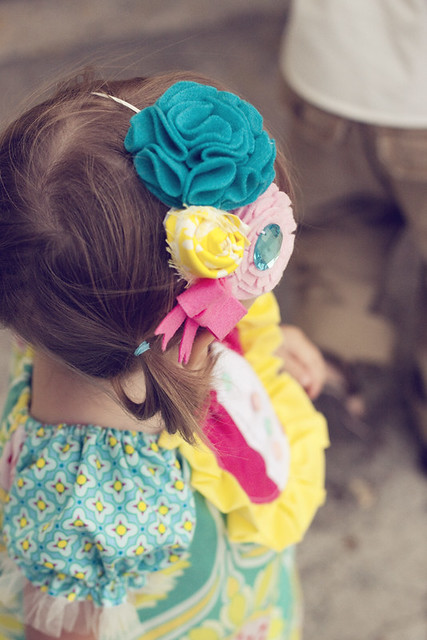
Now to begin with this headband is inspired by those made over on Heart Made. She does the most fabulous job of documenting her creations and every now and then will give you a little sneak peak of how she makes the amazing headbands in her Etsy shop, like HERE for example. So lets start out making our folded felt flower. I do this a little differently then she teaches on the tute I linked to above. Mainly because it makes it go faster ha!
First you will need to cut out one large felt circle and several smaller felt circles
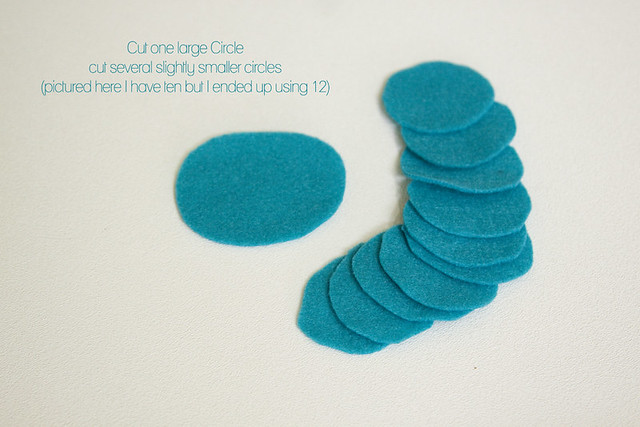
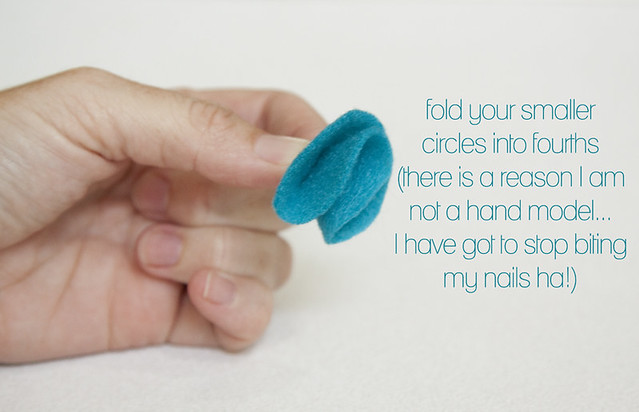
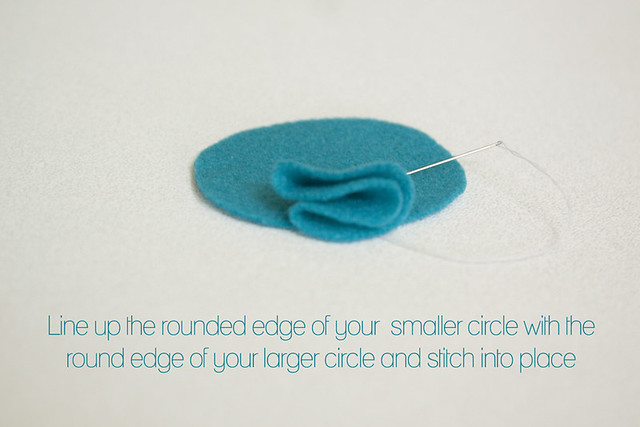
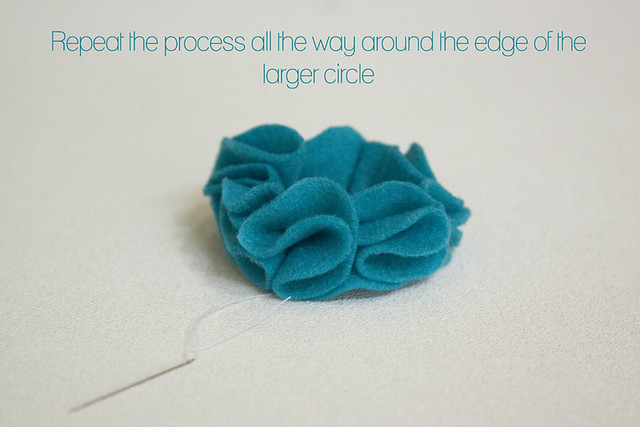
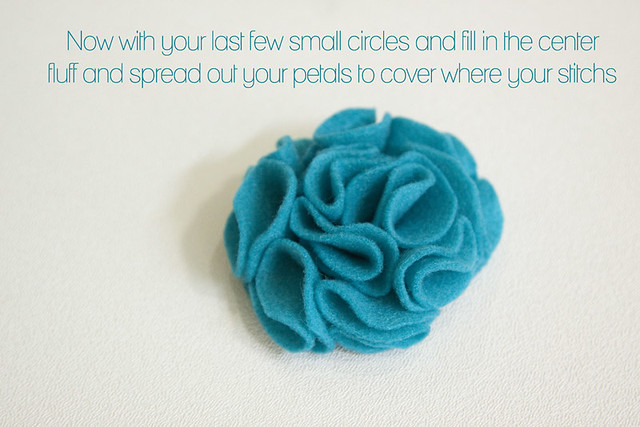
Easy peasy right? Alright, now set this flower aside and grab some more felt, preferably in a corresponding color for your outfit. Now we are going to make the stacked flower. (Sorry about the light printing and dark pictures, 11pm isn't the best time for lighting ha!)
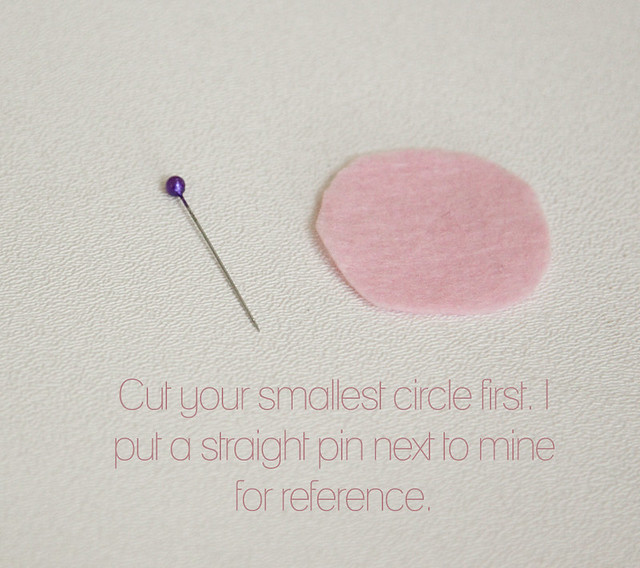
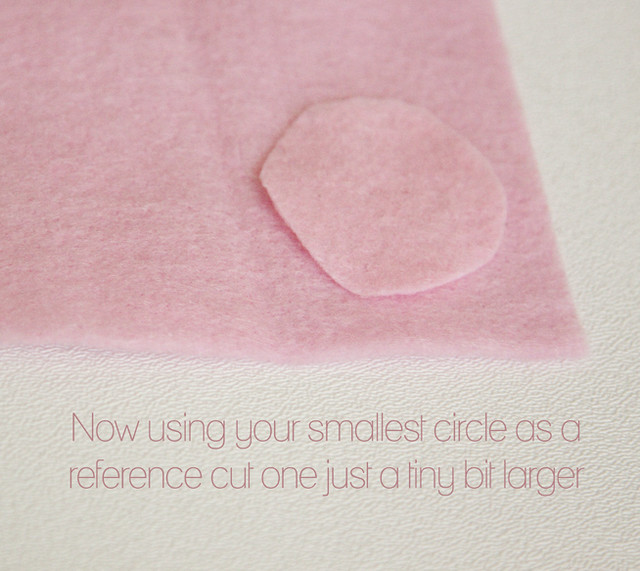


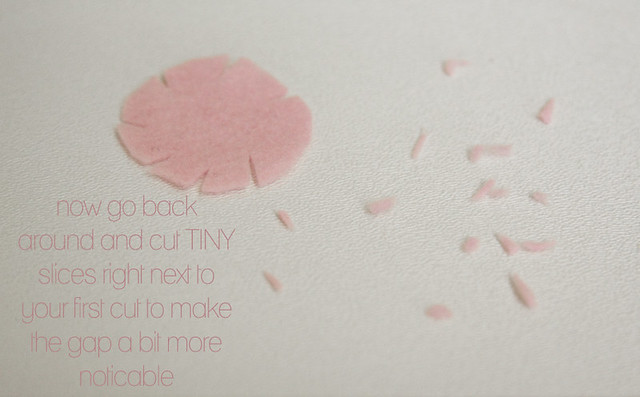
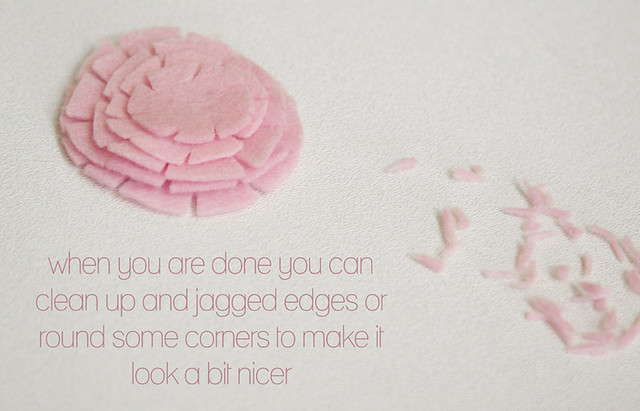
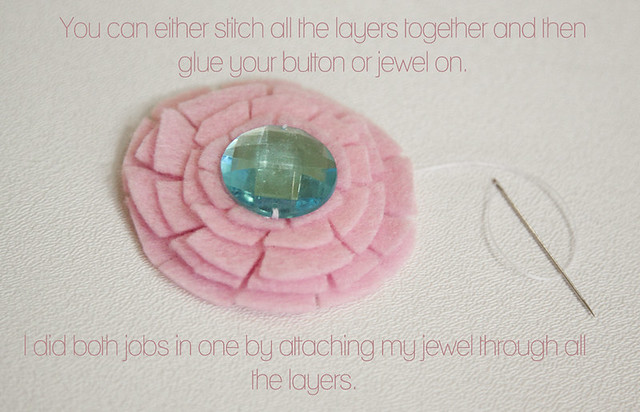
All done with flower number two! Now on to how to make the fabric rosette. I first did a tutorial for this at the end of THIS post but I thought why not revisit it, it's not like how to make them is and original thing anymore :)
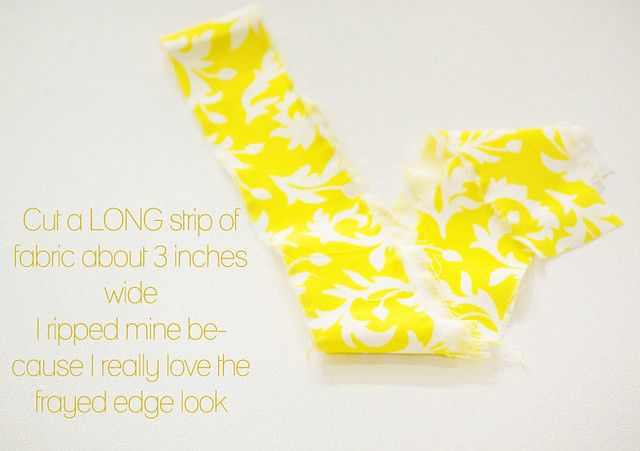
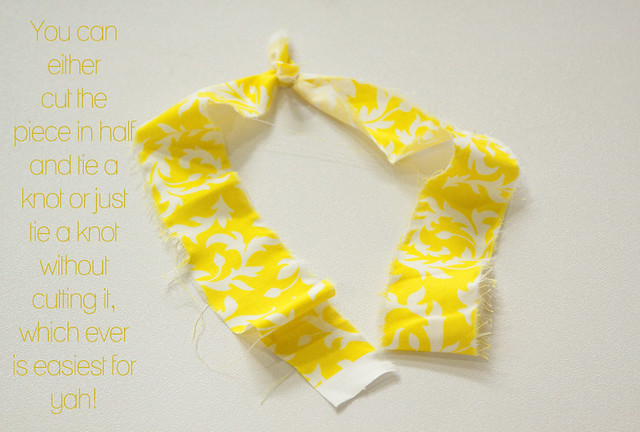
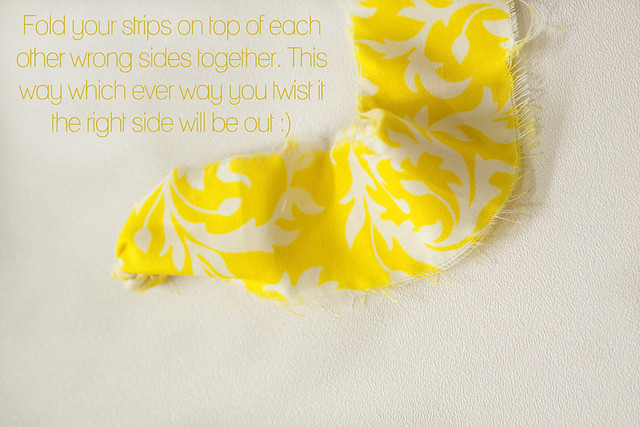
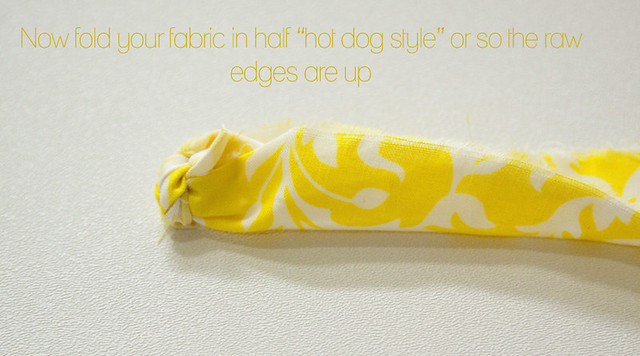
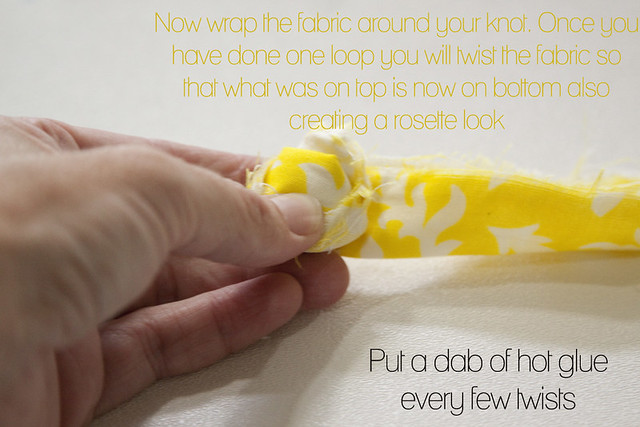
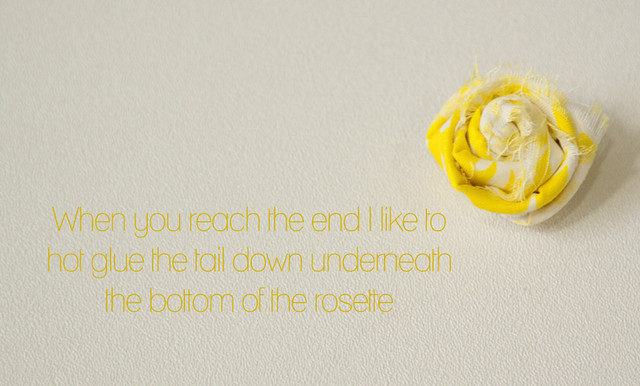
Three flowers down, all that is left is the bow. I am sure there are better ways of doing this but since I am not a HUGE fan of bows (I think they are super cute just don't ever seem to wear them or put them on Evie) I went for the path of least resistance ha!
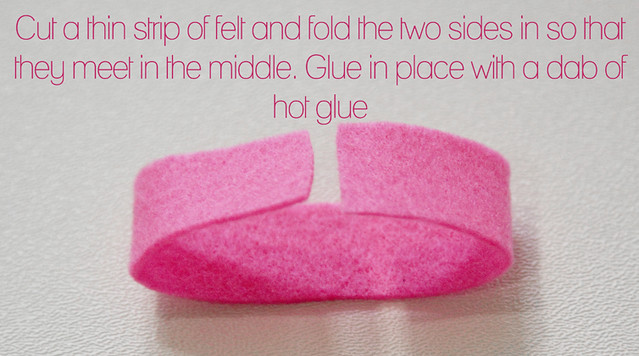


Now all thats left to do is assemble... the minions!! Ha! Okay so maybe I have watched Despicable Me a few to many times. Forward with the assembly of the headband :)


It may be a bit over the top for some, but you could always tame it down by making the felt flowers a bit smaller and without a ginormous blue jewell ha!
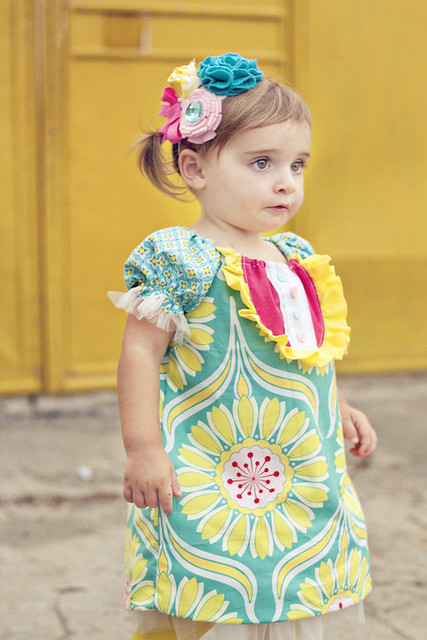
I couldn't believe Evie kept it on for as long as she did. Although, if you notice in ever picture it looks like something is in her mouth... yup we had to go with the candy bribe this time. Don't worry I made sure not colored drool got on the dress :) There you have it! I hope you win, but if not now you can make your own to match YOUR cuties Easter dress, AND make matching ties and bow ties to go with it!


This also gave me an excuse to get the boys gussied up in their Easter outfits and do a mini photoshoot.

I literally thought of this at 4pm and ran around like a crazy women so the chillins were feed, dressed and ready to go when Daddy got home at 5:30. That even meant making Sawyer a bow tie!

I used Cheri's retro pointed bow tie pattern from I am Mama Hear Me Roar. It was ridiculously easy to sew and took me no more then ten minutes once I had it cut out (which took about 2 ha!) I had the dickens of a time tying it though but I think that is mainly due to my inability to EVER learn how to even tie a tie let a lone a bow tie. Liam's tie is actually a hand me down that I made Sawyer and is comically WAY to small. You can find the pattern and tutorial HERE by yours truely although I am going to be making a next size up pattern pretty soon :)

Evie's dress will also go to the winner of the giveaway (details at the start of the tute). It was my original creation for the week in Project Run And Play where we fiddled with the Sweet Dress pattern. I loved it but it wasn't over the top enough for me, super cute but rather unoriginal. So, I set it aside and came up with the Couture Cutie or Mullet dress.

This little number ended up making it to the darkness that is Evie's dress closet and was not retrieved until this photoshoot. We just don't have opportunities to put dresses like this on her so I thought it should go to a good home where it will get worn! Her leggings are of course from We Love Colors. Oh and I totally forgot to mention last time (and received a few inquires about it) Evie's shoes, both the gold pair from before and this white pair are from Target online. I got them for a steal of deal: $2.30!!! I even ended up ordering some extra pairs for other little girls on the island ha! Okay enough about the clothes on to give away details and the tute.
Give Away Rules:
Leave a separate comment for each please:
You can be entered once by leaving a comment
A second time but posting about it on Facebook
But you MUST be willing to check back to see if you won by Saturday night USA time. I am currently in Singapore and want to get this in the mail while I am here so it will get to you lickety split as opposed to the over six weeks it would usually take. That means I HAVE to have your address by Saturday evening USA time so I can get the package in the mail on Monday morning my time. Yup, that means this is a super fast giveaway.
Now on to the Tute!!!

Now to begin with this headband is inspired by those made over on Heart Made. She does the most fabulous job of documenting her creations and every now and then will give you a little sneak peak of how she makes the amazing headbands in her Etsy shop, like HERE for example. So lets start out making our folded felt flower. I do this a little differently then she teaches on the tute I linked to above. Mainly because it makes it go faster ha!
First you will need to cut out one large felt circle and several smaller felt circles


Easy peasy right? Alright, now set this flower aside and grab some more felt, preferably in a corresponding color for your outfit. Now we are going to make the stacked flower. (Sorry about the light printing and dark pictures, 11pm isn't the best time for lighting ha!)


All done with flower number two! Now on to how to make the fabric rosette. I first did a tutorial for this at the end of THIS post but I thought why not revisit it, it's not like how to make them is and original thing anymore :)


Three flowers down, all that is left is the bow. I am sure there are better ways of doing this but since I am not a HUGE fan of bows (I think they are super cute just don't ever seem to wear them or put them on Evie) I went for the path of least resistance ha!


Now all thats left to do is assemble... the minions!! Ha! Okay so maybe I have watched Despicable Me a few to many times. Forward with the assembly of the headband :)


It may be a bit over the top for some, but you could always tame it down by making the felt flowers a bit smaller and without a ginormous blue jewell ha!

I couldn't believe Evie kept it on for as long as she did. Although, if you notice in ever picture it looks like something is in her mouth... yup we had to go with the candy bribe this time. Don't worry I made sure not colored drool got on the dress :) There you have it! I hope you win, but if not now you can make your own to match YOUR cuties Easter dress, AND make matching ties and bow ties to go with it!


Thanks for the headband tutorial. I have some dresses done, now just need the headbands to match!
ReplyDeleteSuper cute dress! I love the tulle peaking out.
Thanks again!
Very cute dress and headband... I love the bright colors!
ReplyDeletei just love the headband and dress! thanks for the giveaway!
ReplyDeleteI love it! Thanks for the idea of making the headband. I think I will use the method for making some cute clips for my daughter!
ReplyDeleteLove the photos of the kids together, so cute! Thank you for the tutorial, I think I may try to make it! Would love a chance to win this one too :)
ReplyDeleteVery, very cute! How do you get her to keep it on her head though? Does she not pull it off like my daughter always seem to do?
ReplyDeleteAlso, I would love to win that dress.
Super cute!!!! I love the tulle. I'm a sucker for tulle. LOL
ReplyDeleteI would SO love to win the dress!!
oh, i have just the outfit i need to make a handband for. thanks for the great tutorial!
ReplyDeleteWhat a great dress (I'm imagining it right now on my daughter - sweet)! I can't believe you would take the time to think of us readers out here in cyberspace while you're in Singapore - how nice!
ReplyDeleteThanks for the tutorial, I'm just loving the flowers!!!
ps - I clicked the little facebook icon under this post and it let me post a comment to my facebook page. I'd never done tat before - amazing how easily things are linked together on the internet. Just think - if you were born one generation back, you'd e stuck in no mans land without the internet and EVERYTHING would take 6 weeks, even a simple letter!
ReplyDeleteWhat a super fun outfit! I love all the bright colors. WHat a fun way to spruce up a little girl!
ReplyDeletevery very cute, thanks for the inspiration
ReplyDeleteThat is an adorable dress. Any my bald baby needs some bling on her fair little head.
ReplyDeleteThanks for your generosity!
Also shared it on FB hoping one of my friends will win if I don't and then give it to me, since it is little D's birthday this month. :)
ReplyDeleteI love love LOVE the headband and dress. i would LOVE to win the dress and have my little girl wear it. I'm going to make a headband for sure and would love to try to make the dress too.
ReplyDeleteso cute and thanks for the tutorial!
ReplyDeleteIt's adorable! I'd love to win!
ReplyDeleteI posted your giveway on Facebook!
ReplyDeleteWhat an awesome giveaway!! You make the best stuff EVER!!!
ReplyDeleteashleewright07(at)gmail(dot)com
I'm having my first girl in May:):):) I would love this pretty dress for when she is bigger:) I also have 2 boys:) mine are 2 and 4 right now!
ReplyDeleteThank you for the giveaway and tute! I'm excited to make headbands:)
krystalschriner@hotmail.com
I love love LOVE this dress!
ReplyDeleteJaimee
jetyson747@yahoo.com
I usually don't enter giveaways but I couldn't help myself! I LOVE this dress and headband! So cuteand I love your style. You have been an inspriation in so many ways to me, thank you!
ReplyDeleteSorry, forgot yo put email....pieceofcakery@gmail.com :)
ReplyDeleteI posted about the giveaway on facebook!
ReplyDeleteJaimee
jetyson747@yahoo.com
Ok, So I seriously LOVE your blog. Everything you make is super cute! You've been in my reader since close to the beginning but I have never commented. I know kind of rude, but I had to tell you how much I adore all of your cute headbands you have been making lately, hopefully I'll make a few for Easter!
ReplyDeleteSo adorable! What a fun spring dress!!
ReplyDeleteOh how cute. I would LOVE this. My Erin would be so sweet in it. Oh thanks for the opportunity!
ReplyDeletelesliewilliams at hotmail dot com
I LOVE IT!!! Thank you for sharing :). Would love to win of course!
ReplyDeleteI love every single thing you do!
ReplyDeleteThis dress and headband combo is to die for :)
kristin.sexton@yahoo.com
So cute!! Love this giveaway!
ReplyDeleteThis is such an adorable adorable dress! I love the colors! My sweet little one would look so cute in it!
ReplyDeleteThanks for the tutorial, cant wait to give it a try!
I love that dress and headband. Lucky for me my daughter is that same size!
ReplyDeleteThis is perfect for Easter. I love the yellow and blue together.
ReplyDeleteI have this fabric! I am totally making an easter dress like that for my crazy little 3 y/o!
ReplyDeleteThis dress is super cute and the headband rocks! Sooo need to make of those for my daughter.
ReplyDeleteThis is adorable! I can't wait to make the headband for my little one.
ReplyDeleteThe headband tutorial is great! Thanks =)
ReplyDeleteAll images are sooooooo very lovely!
Adorable!!! This would make a great gift for my niece. :)
ReplyDeleteky.jackson@gmail.com
Thanks for the step-by-step even though the directions were in other places. Sometimes it's easier to see it all come together :) My little girl is the same size as yours, and I love the dress! Thanks for sharing it with us!
ReplyDeletelauradavis2005 at gmail dot com
So stinkin' cute!
ReplyDeletewhiteplumerias at aol dot com
Oh i love this SO so much! SO cute :)
ReplyDeletesugarbabyboutique.blogspot.com
sugarbabyboutique {at} gmail {dot} com
So cute! Would love to see this on my little girl. Thanks for the giveaway!
ReplyDeleteMy almost 4 year old is becoming obsessed with headbands. Perfect timing for this tutorial! Thank you for taking the time to share it with us.
ReplyDeletesarahart at hotmail dot com
Kelly - you never cease to amaze me. I am so incredibly in awe of you!!! PS - I was in Paris last weekend.. and couldn't stop thinking about how jealous I am that you are MOVING THERE!!! What a change!!! I think my daughter would LOVE that dress!!!
ReplyDeleteI also posted this on my facebook!!! YAY!!!
ReplyDeletemindyreid at gmail dot com!!!!
xoxo-
I LOVE it!! My little cutie would look precious in it!! :)
ReplyDeleteI posted on Facebook too! :)
ReplyDeleteso cute :)
ReplyDeleteemilygraceneilsen@yahoo.com
posted on Facebook :)
ReplyDeleteAdorable! as usual I must say! Thanks for the fun tutorial too.
ReplyDeleteCute dress and headband! I'm a new follower so looking forward to reading your posts!
ReplyDeleteKelly I LOVE this dress and headband! They are soo stinking cute. Even though I don't have any kids, I would give this to my wonderful neighbor/BFF who just had a little girl!
ReplyDeleteGorgeous! The dress and the headband are so amazing. Thanks for sharing the tutorial and for the chance to win them! You are so generous! I hope my little girl gets to show them off! :)
ReplyDeleteI love all of your tutorials and products! You are an amazing gal!
ReplyDeleteThose are some great ideas for a headband!! You are so amazing. I'm making my daughter a few of those dresses and now I have ideas for a headband or bow to match. Thanks!
ReplyDeleteYou know, it is over the top, but totally, crazy adorable! I wouldn't wear it myself, but I'd definitely put it on my daughter!!
ReplyDeleteAdorable and perfect with the dress!
ReplyDeleteSo cute! I love how it goes with the dress.
ReplyDeleteHow fabulous! Would love to have it for my girlies to wear!
ReplyDeleteJust found out we are expecting a baby girl, so I am about to cut out a Sweet Little Dress to make for her. I would love to see your version show up on my doorstep for some inspiration!
ReplyDeleteSo darn cute!! I would love to win this dress and headband!!!
ReplyDeleteFacebooked about it!
ReplyDeleteI love this tutorial! My daughter and I love to make flowers to wear in our hair, and the colors in this dress are fantastic!!!
ReplyDeleteI just love all of your stuff. I try to copy what you do, but your stuff always looks so much better!
ReplyDeleteshared on facebook as well! :o)
ReplyDeleteLove the headband! Definitely a modern take on the Easter bonnet...LOVE!!
ReplyDeleteBeautiful headband. You do great work!
ReplyDeleteI would love to win the dress...It looks to be just my daughter's size :)
ReplyDeleteSo cute, I would love to win it for my niece! Love the headband. I made one similar for myself!
ReplyDeletehollydonahue at hotmail dot com
This is so cute! Thanks for the giveaway!
ReplyDeletebufordkyle at hotmail dot com
Completely adorable! Your work is lovely as always :)
ReplyDeleteHonichu2 at hotmail dot com
Love that dress..do you remember what the fabric is so i can go find me some???!!!!:)
ReplyDeleteJust darling! As always....
ReplyDeleteThanks for the tutorial.
LOVE the head band!!!So cute!
ReplyDeleteThis is beautiful! I am not sure I could replicate that :)
ReplyDeleteLove those colors together! Super cute headband too!
ReplyDeleteSuch a darling dress and headband. Thanks for a chance to win!
ReplyDeleteThis is such a great look. Looooove the dress and love the headband.
ReplyDeleteLOVE LOVE LOVE!!!!
ReplyDeletelove the bright colors. I'm going to try to make one today!
ReplyDeleteI cannot wait to start making all of these great flowers! This would look too cute on my little girl! Thanks!
ReplyDeleteShared on facebook too!
ReplyDeleteWhat a sweet dress! I love the headband too.
ReplyDeleteLove it. I would love to win. I am going to have to try and make one of the lovely headbands.
ReplyDeleteI'd love to win this! super cute!
ReplyDeletejnine_n(at)hotmail(dot)com
Love everything about the dress and headband. Hope we win!
ReplyDeleteAmy
So cute! I made those adorable felt flowers this weekend. I will be making some more soon. Thanks for the tutorial.
ReplyDeleteThis dress is precious!!! My daughter would love to wear it for Easter :)
ReplyDeleteHas the winner been announced? :)
ReplyDeleteI have been wanting to make a daughter a few peasant style dresses for the spring!! Love the way to embellished this one!!!
ReplyDeletehttp://thedomesticatedmama.blogspot.com/
I LOVE LOVE LOVE this headband. LOVE!
ReplyDeletethanks for the tutorial.
LOVE your blog! Thanks for the awesome tutorials and patterns. I used this tutorial to create headbands for my daughters Easter outfits! Just wanted to share the link with you...
ReplyDeletehttp://jamespurejoy.blogspot.com/2011/04/happy-easter-outfits.html
Thanks again!
I Love you so much~!!!
ReplyDeleteabsolutely adorable! love your tutorial! more ♥
ReplyDeleteHi Kelly:) I already left a comment when this was first posted, but I just wanted to let you know that I've just started a blog and I linked to this page in the post. Please do check it out!
ReplyDeletehttp://odetoinspiration.wordpress.com/
Lindo demais. Obrigada por partilhar!
ReplyDeleteI LOVE LOVE LOVE the dress and headband your daughter is wearing!! Do you have a tutorial of how to make this exact dress (with the tulle coming out of the sleeves and under the bottom...and the bib front)??? I saw the tute for the Couture Cutie or Mullet Dress, but I want to make the Easter dress pictured above!! It is amazing!!! Thanks for your awesome tutorials!
ReplyDelete