


I thought while all the fun giveaway was going on a I should still post a tutorial right? If you are looking for the giveaway it is the previous post. Good luck!!
Evie's room is one of the family's favorites to play in. She has a wicked awesome kitchen and thanks to a friend enough food to stock a restaurant. The boys and I end up in there playing very masculine versions of tea party almost daily. The problem is it usually is interrupted by potty breaks, snake time, tag etc. and we will run out of the room quickly. Evie will usually stay and hang out until we come back (unless food is involved) unfortunately, her bedroom door slams shut very quickly (is our house on a slant?) I made a doorstop previously but my hubby told me it was creepy looking and would give her nightmares. Hiding my wounded ego (totally kidding) I tried again and created this little guy:


His head is full of fluff and the bottom filled with sand. He does the job beautifully, that is, when he is not being played with by someone. I think I may have to make more JUST filled with fluff.
You can find the pattern for our little Door Owl HERE. Feel free to improvise, make the pattern significantly bigger, add a pair of LONG skinny legs anything really.
What you will need:
Pattern
Fun fabric
Felt
Buttons
Needle and thread
Sewing machine
Scissors
Fluff
Clean Sand
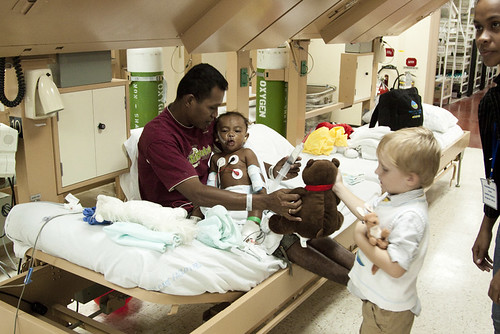
I love this particular Amy Butler fabric. I used it to makes lots of the little birdies from the Spool tutorial to give away. In fact here is Sawyer giving one to a little boy who just came out of surgery.
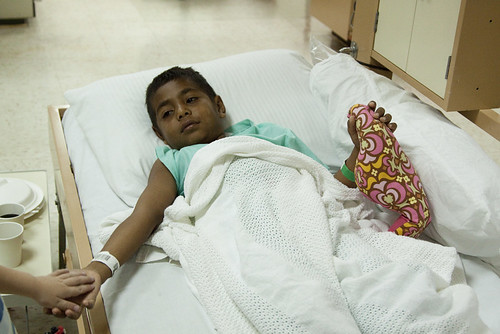
Sawyer was so good with the sick kids. He sat and held their hands and then we sang them lots of fun songs
(I about started bawling when Sawyer asked to sing the "Families Forever" song). It was hilarious because those who could get out of bed pulled up little chairs and I totally felt like we should have prepared better, we just sang whatever happened to pop into my head or was suggested by the boys. ANYWAY more on that later (total tangent ha!). Once you have all your pattern pieces cut out go a head and cut out your selected fabric
Since the owl's back will always be to the door I figured I only had to use cute fabric on the front and just laid a corresponding piece underneath when I cut it
Then cut out all the little tiny pieces for your face/wings/ruffly feathers and lay them out to see how everything looks
This is when I moved the circles around and figured out how many buttons I wanted to use. I started by sewing the eyes on. First the "mask" part, I really like how the tread pops but if you prefer not to see it you could totally use the same color thread as your fabric
I laid out my buttons after MIRACULOUSLY finding matching ones
I layered up the two eye pieces and sewed them on AFTER using my pinking sheers on them. Then I attached the two buttons and the nose
Next you can sew on the larger tummy part. I barely sewed this on because I knew when I attached all the feathers it would stay put. With the "feathers" I started at the bottom and worked my way up to the top. I laid mine pretty close to the bottom because I wanted them to hang over. The only problem with this is you have to remember to push them up when you are sewing the back of the owl to the front, otherwise they will get sewed down. I attached the side feathers last and only the portion on the inside.
Now place your two main owl pieces right side together and sew all the way around, leaving a small hole so you can turn it right side out and fluff it. I left a postion on the side of my owl open. The bottom would be best, but since that is where the sand goes that makes it a little tricky. Anyhoo once you have it turned right side out stuff some fluff up into your owls noggin', don't over stuff, just enough to give it some volume and keep it open for pouring the sand in.
Now for the feet. I just cut two pieces of felt willy nilly into what I thought owl feet might look like and then topstitched them to each other.
I then attached them to the bottom of Owl Doorman with a simple topstitch
I then went across the street and got some sand at the beach, then bleached it (I am only slightly neurotic)
I poured about half the bowl in through the hole into the bottom of the owl. Go little to begin with you can always add more. Once you feel you have enough to make your owl stand up well finish by adding all the fluff you need to make him nice and chubby. Sew up your little hole and bobs your uncle you have your own personal Door Owl.
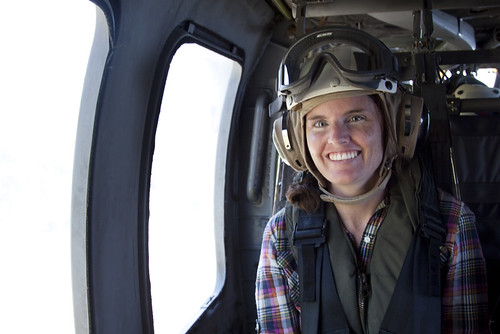
They make super cute plush toys. Speaking of which I was able to go photograph the commander of the Mercy visit a Medcap and hand out some toys on the other side of the island. We had an amazing helicopter ride over (she told me I was lucky to fly with her because they take her to all the best spots and boy was she right). This is me all geared up on the helicopter
These are some of the cuties I got to give toys, books etc. to AND play a rousing game of soccer with one of them on my shoulders.
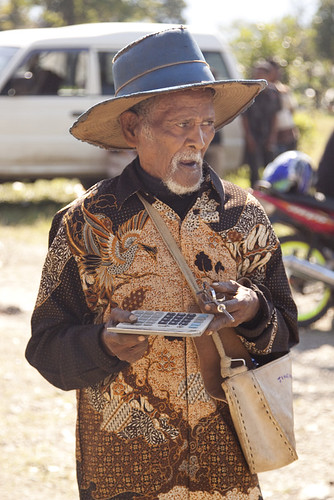
This was the village crazy man who walked around talking into the whipper and holding up the calculator and shouting. Other then that he seemed very nice.
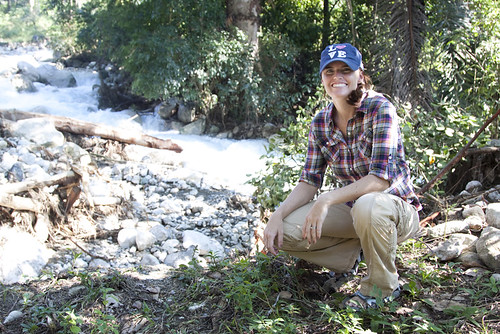
And finally the gorgeous river that ran through their community and basically sustains them.
It was gorgeous and once again I was reminded how truly and out of this world blessed I am.
Cheers
Kelly


That's such a cute idea! I might do one but make it more for a Halloween decoration.
ReplyDeleteBTW, I'm Elizabeth Moon's sister.in.law and she told me about the blog. I've been waiting to get my new sewing machine and make a the high waisted skirt you have.
I love it... aren't owls just great!!! That is so sweet that you are giving the little birds away!!!
ReplyDeleteCute, I just made an owl plushie. I love owls! Mine was all filled with fluff, never thought of making one as a door stopper.
ReplyDeleteI just made an owl, too! You can see it on my blog.
ReplyDeleterachel-thelifeofriley.blogspot.com
I never really thought I had a "thing" for owls - until now.....but that is so cute - I may make one tonight!
ReplyDeletevery cute!! I love it--thanks for another great tute...the pics of your adventure were just great, made so great by the appreciation and thankfulness that shone through :)
ReplyDeleteSuper cute owl!
ReplyDeleteThis may seem like a silly question...but how do you bleach sand?
ReplyDelete