Oh dear what a doozy of a week we have had. A horrible stomach flu went through our family. I guess it was nice in that we all had it on separate days? Which basically meant there was a constant stream of towels and sheets to the laundry. When I finally came down with it? Well lets just say all of a sudden those first three months of pregnancy came vividly back ha! Then on this weekend it was our 9 year wedding anniversary! I thought I was well enough to go to dinner so we headed to one of the 3 "Nice" restaurants in Dili. Unfortunately mid way through I started feeling as if I was having one huge long contraction and was basically doubled over in pain. With dinner packed up and apple pie to go we headed home. Thankfully after a hot bath, a heating pad on the lower back and some sprite I was feeling better. Of course not until after I had gone through the list in my head of who I could possibly call for help (there are no OBGYN's or the like on the island) Needless to say I am feeling a bit more anxious to head back to the States and be near a Doctor. ANYWAY that is what has been keeping me busy all week. I have been dying to get these posts going because in a matter of days the computer/sewing machine will be packed up and ready for transport whoo hoo!
Now I am sure there are other (probably better) tutorials on how to make a pattern. I just wanted to share the rather random way I do it :) Making your own patterns, much like anything, gets easier the more you do it. The first time I "knocked off" a dress a few years ago I literally unpicked the entire thing, copied the pieces and then sewed it back together. I NEVER did that again, holy cow was that a ton of work (but it was a super cute dress ha!) As you do it you will get used to the repeating pieces you will find in most dresses. Once you find a sleeve you like you will find yourself using it over and over and not having to make a new pattern piece (Shabby Apple uses basically the same sleeve on A LOT of their dresses). This will mean an easier AND faster time. Since the Toe the Line dress is both straightforward and tricky at the same time I thought I would show you how I made the pattern for the back of the dress and you can get the general gist of how I do it. Honestly the front pieces took my a while to figure out but that is the fun of knocking off a dress! These dresses are gorgeous and if they were easy to make they wouldn't cost as much as they do or look as good. I would highly suggest going with something simple first like an easy wrap dress and then as your confidence grows branch out! If you begin with inexpensive muslin for the fabric you won't worry about waisting fabric and money and believe me you will learn a TON about sewing ha! If you would like to follow a long but have some concrete help you can now print out the Toe The Line Knockoff Pattern HERE. Or if you would just like to print it out and get a head start by cutting out your fabric there you go!
Using all those Measurements
If you haven't already you HAVE to have all your measurements taken before you start. Click HERE for a complete guise and handy printable table!
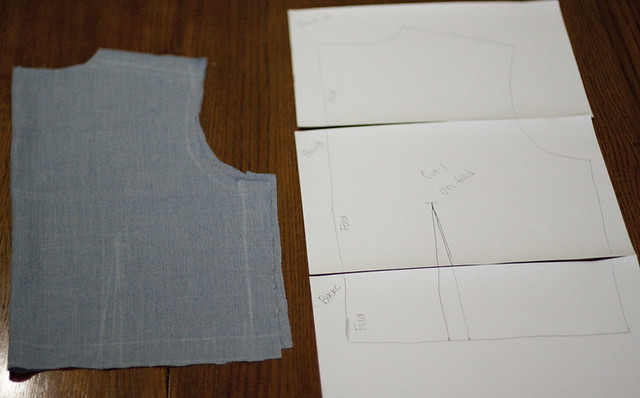
Now, since I have been doing this a while and know my body measurements pretty well I have moved on from muslin and just "go for it"unless the dress is particularly difficult. To be totally honest sometimes I just draw in chalk right on the fabric (as you will see below) The back of this dress is nice and straight forward which is great! If you own a Shabby Apple dress, or zoom in on the pictures you will notice that their dresses often use darts to create a beautiful silhouette, Toe The Line is no exception. Make sure to mark any darts you will make on your pattern. Just so you see what we are going for when I was done with my pattern piece it looked like this:

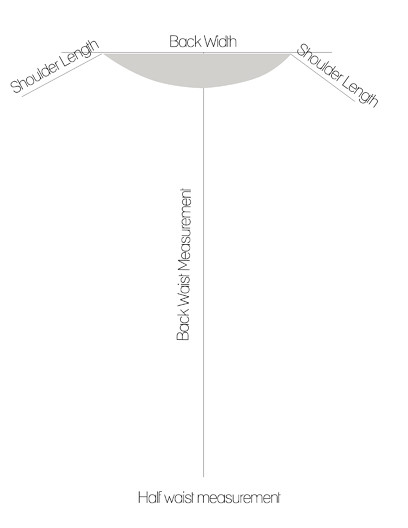
I started out by using my Back to waist measurement to draw a straight line. This would be the center of my back piece. This could also be considered the "fold" of the fabric. You really only have to draw everything on either one side or the other when you have a fold like this, but I did both in this just to be thorough.
 \
\
I then use my Back width to create a T across the top. This will be made into a nice dip shape later. I then use my shoulder length to create my shoulder lines.

You may need to measure from your top neck bone over to your shoulder blade so you know where to begin your shoulder line. (This would be another good measurement to write down).

Now I want to make a scoop neck in the back. Starting where the shoulder length begins I draw a nice slope down to meet the center back line. I then do the exact same arch on the other side.

Then I use half my waist measurement to draw a straight line across the bottom perpendicular to my center line. (I have no idea why only the typing showed up not the line).

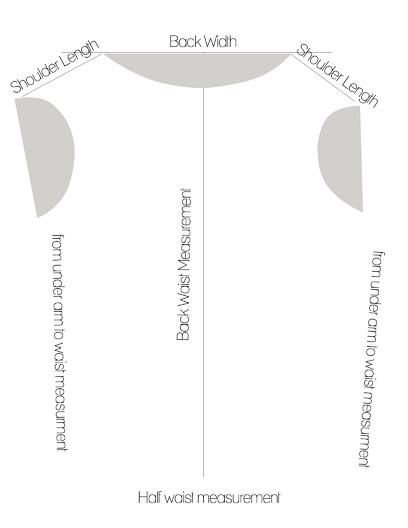
I then take the measurement (which I totally should have included on the list) from right under my arm down to my waist. I prefer to do this straight down and then use darts to taper the fit. If you hate darts for some reason you could do it at an angle. I pictured it here with an angle just for simplification.

Now you are going to need to make your arm holes. This can be tricky when you are by yourself. I like to roughly measure the arch and then try to recreate the measurement. This is hard if you are by yourself. If you are by yourself use the measurement from the top of your shoulder to your under arm and add a generous amount for rounding and seaming.

Once I was done I transferred my pattern onto 8.5 X11 paper. I try to make sure to add a nice hefty seam allowance while doing this.

This is a rather sloppy one usually I try to do them nicely enough that if I HAD to I could leave it un-digital and people would still want to use it :) I try to make sure each sheet contains the name of the dress, the piece it is, where the fold is, cutting instructions and any darts, pleats etc.
Once digitized it will look like this:
(This is 3 pages merged together)

But digitizing your pattern once you make it is for my next post!!!
Hope this was clearer then mud ha!

Now I am sure there are other (probably better) tutorials on how to make a pattern. I just wanted to share the rather random way I do it :) Making your own patterns, much like anything, gets easier the more you do it. The first time I "knocked off" a dress a few years ago I literally unpicked the entire thing, copied the pieces and then sewed it back together. I NEVER did that again, holy cow was that a ton of work (but it was a super cute dress ha!) As you do it you will get used to the repeating pieces you will find in most dresses. Once you find a sleeve you like you will find yourself using it over and over and not having to make a new pattern piece (Shabby Apple uses basically the same sleeve on A LOT of their dresses). This will mean an easier AND faster time. Since the Toe the Line dress is both straightforward and tricky at the same time I thought I would show you how I made the pattern for the back of the dress and you can get the general gist of how I do it. Honestly the front pieces took my a while to figure out but that is the fun of knocking off a dress! These dresses are gorgeous and if they were easy to make they wouldn't cost as much as they do or look as good. I would highly suggest going with something simple first like an easy wrap dress and then as your confidence grows branch out! If you begin with inexpensive muslin for the fabric you won't worry about waisting fabric and money and believe me you will learn a TON about sewing ha! If you would like to follow a long but have some concrete help you can now print out the Toe The Line Knockoff Pattern HERE. Or if you would just like to print it out and get a head start by cutting out your fabric there you go!
Using all those Measurements
If you haven't already you HAVE to have all your measurements taken before you start. Click HERE for a complete guise and handy printable table!
Now, since I have been doing this a while and know my body measurements pretty well I have moved on from muslin and just "go for it"unless the dress is particularly difficult. To be totally honest sometimes I just draw in chalk right on the fabric (as you will see below) The back of this dress is nice and straight forward which is great! If you own a Shabby Apple dress, or zoom in on the pictures you will notice that their dresses often use darts to create a beautiful silhouette, Toe The Line is no exception. Make sure to mark any darts you will make on your pattern. Just so you see what we are going for when I was done with my pattern piece it looked like this:

I started out by using my Back to waist measurement to draw a straight line. This would be the center of my back piece. This could also be considered the "fold" of the fabric. You really only have to draw everything on either one side or the other when you have a fold like this, but I did both in this just to be thorough.
 \
\I then use my Back width to create a T across the top. This will be made into a nice dip shape later. I then use my shoulder length to create my shoulder lines.

You may need to measure from your top neck bone over to your shoulder blade so you know where to begin your shoulder line. (This would be another good measurement to write down).

Now I want to make a scoop neck in the back. Starting where the shoulder length begins I draw a nice slope down to meet the center back line. I then do the exact same arch on the other side.

Then I use half my waist measurement to draw a straight line across the bottom perpendicular to my center line. (I have no idea why only the typing showed up not the line).

I then take the measurement (which I totally should have included on the list) from right under my arm down to my waist. I prefer to do this straight down and then use darts to taper the fit. If you hate darts for some reason you could do it at an angle. I pictured it here with an angle just for simplification.

Now you are going to need to make your arm holes. This can be tricky when you are by yourself. I like to roughly measure the arch and then try to recreate the measurement. This is hard if you are by yourself. If you are by yourself use the measurement from the top of your shoulder to your under arm and add a generous amount for rounding and seaming.

Once I was done I transferred my pattern onto 8.5 X11 paper. I try to make sure to add a nice hefty seam allowance while doing this.

This is a rather sloppy one usually I try to do them nicely enough that if I HAD to I could leave it un-digital and people would still want to use it :) I try to make sure each sheet contains the name of the dress, the piece it is, where the fold is, cutting instructions and any darts, pleats etc.
Once digitized it will look like this:
(This is 3 pages merged together)

But digitizing your pattern once you make it is for my next post!!!
Hope this was clearer then mud ha!


I'd highly recommend Winifred Aldritch's books on metric pattern cutting. They provide basic patterns and show you how to do a multitude of variations (sleeves, lapels) etc. That way you can design outfits out of your head rather than basing them on someone elses design.
ReplyDeleteThe clothes on my blog are all made using her books, and I'm currently drafting out a pattern for a regency inspired dress for myself.
I hope you are feeling better by the way. My youngest is 6 months and I can remember how frightening those moments can be. I even managed to get whizzed off in an ambulance this time and it was terrifying!
http://dressmakerelves.blogspot.com/
Andrea
french curves are really helpful for getting the right shape to sleeve holes, and you can use the same curve to help create the sleeve which is great too.
ReplyDeleteI just wanted to say that I have been learning so much from your blog. I've always had the dream of designing clothes, but never really thought I could. Lately, I'm studying all the clothes I see and reconstructing them in my head.
ReplyDeleteThanks for sharing your knowledge and insight!
This is a great tutorial! I've struggled for so long to work out for to do this, and now I have a nice easy explanation. Thanks Kelly.
ReplyDeletePS, I love this and the "digitising your pattern" tutorial so much I've featured them on my blog handmadebyclairebear.com
Hope you don't mind!