Sunday, June 19, 2011

The Toe the Line Dress Knock Off

Wow. I cannot believe it has been soooo long since I have posted. What can I say though one packed up house, several good bye parties, one 2 hour flight, one 5 hour flight and one 13 hour flight later we are at our hotel in CA! We found have found the secret to righting your children's body blocks in one day. Just get off the plane at 6:30am and be at Disneyland before 10am! The Crawford's are officially righted ha! This has been soooo much better then on our arrival in Timor where we spent days playing trains and watching cartoons in the wee hours of the morning, ughhhhh. I have some really fun details to share about our last few days in Timor but I wanted to make sure I got this up before we headed off on our Cruise. So here it FINALLY is the Toe the Line Knock Off tutorial.
toeline2
This is Che Che. She was our amazing housekeeper/ Nanny/ Friend for the entire time we were in Timor. She was so fantastic and was a huge part of No Mans Land. There is not way I could have posted so much if it hadn't been for Che Che working so hard. I wanted to make sure she had something to remember us by and I had talked about doing a giveaway of this dress I made. I decided to go a head with that idea only give it to Che Che instead of a reader. I asked her to measure her under the guise of making the dress for my little sister. When I finished sewing it was on a day that was particularly chaotic and begged her to let me take a picture of her in it claiming I had no time to ask anyone else. She obliged. When I was done taking pictures she asked if she could have the pictures that I had printed out to help me knock off the dress so she could have one made when she went home to the Philippines. I told her I had made it for her so that whenever she wore it she would think of us and she started crying, I then of course started blubbering and it was a mess ha!
toeline3
If you would like to make your own it is actually a fairly easy and straight forward dress. The neckline is the only tricky part and that will come together easily as long as you take your time and think before you stitch. I do have to say though that the fabric I used was ordered site unseen. I thought I was ordering a nice Chambray and it ended up being a blend and was chambray but pretty stretchy. Next time around I would certainly use a lawn/poplin cotton or a chambray without spandex in it ha! If you would like to learn how to make the dress click tell me more :) If not then I will see you in a week when my feet touch American soil once again!

Thursday, June 9, 2011

My Go To Lens

I swear I am alive...barely ha! I swear there is a tutorial for how to make the Toe The Line Knock off dress coming. It has been a CRAZY week trying to organize shipments to three different locations, selling and giving tons of never used items away, AND doing a photoshoot every single night of the week! Yup, things have been busy. And since it is my policy to have a 24 hour turn around with clients and their pictures (I ABHORE waiting to get my DVD from photographers) I have been spending my "after the kids go to bed" time preparing DVD's etc. All this photography got me thinking that I haven't done a photography post in a while. Then I thought about the fact that LOTS of photographers just starting out really struggle with what lenses to spend their hard earned money on. Now of course this all depends on the type of photographer you are, your disposable income limit etc. I am basically a family photographer, specializing in children and newborns.
T3proof
This means my subjects are wiggle, high energy and a good shot sometimes just means no one if picking their nose and everyone is looking at the camera (although I don't consider it a successful session unless I get 25 frame able shots)
family5proof
Shooting families (often with pups as pictured above) means I don't often have the luxury of switching lenses several times. I have to have a go to lens that stays put until I feel I have gotten enough good shots that I can mix it up, take a break and put something fun on my camera.
babyinred1
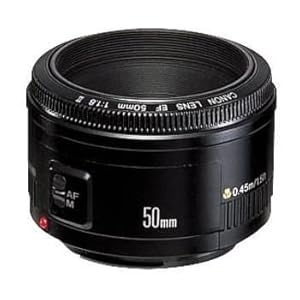
This lens for me is the 50mm 1.8.

It is Uh-Mazing.... for the cost. At an average of $110 found HERE on amazon and HERE on B&H Photo for great deals, no beginning photographer should be with out it. All of the above pictures were taken with it. You could go a bit further and get the 1.2 but I find that I rarely go down below 2.8 when shooting children, unless I want that SUPER sharp amazingly clear close up shot.
harvey2bwproof
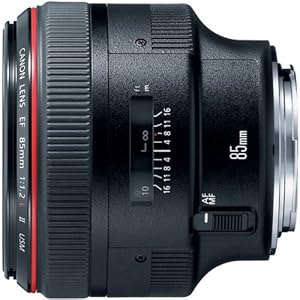
To be honest I usually save shots like this for the end and snap on the splurge of my photographic career the 85mm 1.2.

This lens is prohibitively expensive and absolutely amazing in its color saturation and clarity. The problem is with family photography the 85mm demands LOTS of space and most of the time you will be shooting at 3.8 or higher so you won't really use the 1.2 soooooooo much.
noah3proof
If you can, go for it but I am TELLING you 8 times out of 10 my favorite pictures from a shoot are with the uber affordable 50mm 1.8. Which come on is 20% of the time worth 10 times the cost? I don't think so.
family2proof
Now in closing I have to admit that I am a prime lens junky. I think the clarity they provide is stunning. The fact that they make YOU move not just zoom in and out means you get far more interesting angles and never stop moving (sounds exhausting ha!) I also shoot exclusively in manual. If you want the most out of the lenses you are spending your hard earned money on you have GOT to learn to use your camera to it's fullest. Take some courses, read some books, download some online manuals and practice, practice, practice ;) If you love it, this will never seem like work but always an opportunity to stretch your skills and do something you enjoy ha! Now I promise the next post will be the long awaited for Toe the Line Tutorial... just gotta do the photoshoot HA!!!!!

Friday, June 3, 2011

Sewing Remix: Flapper Baby Romper

I have actually been sitting on this project for WEEKS and it has been KILLING me! I am so excited to share it today and be part of Jessica from Me Sew Crazy's amazing Sewing Remix series! Me Sew Crazy is one of my fav sewing blogs and one of the few I check very regularly for inspiration, a good laugh and some fun eye candy. My little contribution is the Flapper Baby Romper:
flapperbaby3T
When Jess asked me to be part of Sewing Remix I was pretty excited to follow a pattern. But then I kept seeing little outfits like this everywhere:
b8
Source: Simplicity Photography
Or this adorable retro version:
I thought, Evie HAS to have one!!! I wanted to stick to the rules though and remix a pattern. For the perfect place to start I headed over to Made to Dana's free down loadable perfect diaper cover pattern. This gave me a good jumping off point to create The Flapper Baby Romper:
After asking Dana for her permission I morphed the perfect diaper cover pattern into my own Flapper Baby Romper pattern which you can download HERE on my Scribd shelf.  My first attempt was supposed to be Evie sized about 2T... but ended up Carmen sized or about 3-4T
flapperbaby3tB
I tweaked it a bit and then shrunk the pattern you can print out by 80% to get my Evie sized Flapper Baby Romper:
_MG_5910_6955proof
I dunno what it is but these little rompers make their little bums look so adorable ha!
_MG_5955_6989
It is probably how great Dana's original pattern is! Carmen's was a little roomy so in the final tutorial I added an extra step to put some elastic around the waist and cinch it up a bit.
_MG_5788_6528
I also added elastic to the back shoulder blade portion to keep it nice and snug
_MG_5892_6937
If you would like to sew a long and make your own Flapper Baby Romper
_MG_5883_6928
click learn more for all the instructions!! Jessica thanks so much for having me and I hope you are getting some much needed R&R before this little blue bundle of joy comes!
So funny story, we did this photoshoot right before everyone in our family got super sick. I don't think she was feeling the best this particular day so as a "thank you" for cooperating after pictures we took the kids for milkshakes. None of us were able to finish our entire shake, except for Evie.
 flapperbaby1
Who not only finished her own shake but then proceeded to go down the line and polish off everyone else's
flapperbaby2
That night when Finn started getting sick I thought FOR SURE all those milkshakes were going to come back up
flapperbaby3
But Evie was the only cutie who DIDN'T get sick! Maybe all that calcium staved it off ha!
ANYWAYS on to the tutorial!!!

Thursday, June 2, 2011

Scrap Your Stash: BHLDN Knock Off

I am really excited to be part of Susan's at "Living with Punks" scrap your stash series! Everyone knows a huge part of my sewing is using what you have and saving every piece so this was right up my alley! My actual problem was narrowing down what scrap project I wanted to make! (There are a few I will be doing this summer but they have to wait until I can get specific supplies). With my little sister getting married this summer I have been pouring over wedding sites and of course a personal favorite is Anthropologies BHLDN. I was looking at their table decor and saw THESE fabulous fabric napkin rings:

 Lightening struck and the internet stood still (literally our power went out) and I knew it was PERFECT!! Pretty sure $5 a napkin ring was about $5 to much ha! I grabbed some of my scraps and went to town.
_MG_6104_7095
How cute could these be for any family picnic, sunday dinner, classing up a birthday or if you have a TON of scraps a wedding?
_MG_6102_7093
So if you would like to learn how to make my BHLDN knock off napkin rings hop on over to Living With Punks or click learn more. And if the thought of rolling paper or fabric napkins makes your tummy turn you can always use them as cut little wrist cuffs ha!!
_MG_6101_7092

Wednesday, June 1, 2011

Wild Thing

Evie has never had a haircut. Yeah. She will be two next month and we have never cut her hair. When we moved here to Timor she was only 4 months old.
haircut3
The only trip we have taken off the island to a place that had a salon was in Italy and at that point she didn't have enough hair to cut :)
haircut4
I have been asked how I get her hair in braids, or piggy tails etc. and it is honestly because if I do not put her hair in some sort of "tie" she goes around looking like the shaggy dog (in a super cute little girl way)
Picnik collage
With going on our big family vacation in two weeks I thought it was high time she get a hair cut (that, and her dad asking pretty much everyday when I will cut her hair and Che Che actually jumping and clapping when I mentioned it ha!).
haircut2
Now the problem is, how in the world do you cut little girls hair? I don't mean myself by any means, we are taking her to the one Australian who cuts hair even though I must admit I will be paying more then I will EVER pay for a child's hair cut ughhh.
haircut1
What I mean is she has such thin, uneven hair with a cow lick that comes all the way from the back of her head. Do any of you have any advice? Fun websites with cute suggestions on it?
haircut7
I am so nervous about it I feel kinda silly. But as cute as she is:
haircut1
This hair has got to be tamed! Because when you see this wild thing coming at you from behind the cozy coupe,
_MG_6171_7049
you get a little scared ha! Thanks for any suggestions, oh and Evie would thank you too, that is when she is done running me over with the coupe.
haircut6

Monday, May 30, 2011

Making Your Pattern: "Digitizing your Pattern"

Quick reminder that the To The Line Knock off pattern is available to print HERE on my Scribd shalf. 
I should mention that if made as is would result in a dress sized "4".

I think the majority of people who have asked me questions about making patterns have asked how I make my patterns digital. For a while I didn't really want to share this info because I felt like it set my blog apart, having digital ie. not hand drawn, patterns. But I feel like that is a little lame and selfish of me. This method of making your pattern I just made up after fumbling around with photoshop for a few days. It does rely almost completely on Photoshop or Photoshop elements. 


I have no idea how you would go about doing this without several of the elements that these programs offer. If you do not have either of these programs I would highly suggest looking into Photoshop Elements. It is a great entry level editing software that is SOOOO user friendly. There are some aspects of Photoshop elements that I wish Photoshop CS would adopt ha! It is much more affordable and you can see if you will use it enough to make the plunge to a Photoshop Suite! I also thought it would be helpful to have a reference with all the steps so you could simply print it out and have it next to you while you are trying to master the process. You can find the step by step printable HERE on my scribd shelf. Please note that this is not to be reproduced in any form without my WRITEN consent. 
Lets get digitizing!!!

Sunday, May 29, 2011

Making Your Own Pattern: Part 1

Oh dear what a doozy of a week we have had. A horrible stomach flu went through our family. I guess it was nice in that we all had it on separate days? Which basically meant there was a constant stream of towels and sheets to the laundry. When I finally came down with it? Well lets just say all of a sudden those first three months of pregnancy came vividly back ha! Then on this weekend it was our 9 year wedding anniversary! I thought I was well enough to go to dinner so we headed to one of the 3 "Nice" restaurants in Dili. Unfortunately mid way through I started feeling as if I was having one huge long contraction and was basically doubled over in pain. With dinner packed up and apple pie to go we headed home. Thankfully after a hot bath, a heating pad on the lower back and some sprite I was feeling better. Of course not until after I had gone through the list in my head of who I could possibly call for help (there are no OBGYN's or the like on the island) Needless to say I am feeling a bit more anxious to head back to the States and be near a Doctor. ANYWAY that is what has been keeping me busy all week. I have been dying to get these posts going because in a matter of days the computer/sewing machine will be packed up and ready for transport whoo hoo!
Now I am sure there are other (probably better) tutorials on how to make a pattern. I just wanted to share the rather random way I do it :) Making your own patterns, much like anything, gets easier the more you do it. The first time I "knocked off" a dress a few years ago I literally unpicked the entire thing, copied the pieces and then sewed it back together. I NEVER did that again, holy cow was that a ton of work (but it was a super cute dress ha!) As you do it you will get used to the repeating pieces you will find in most dresses. Once you find a sleeve you like you will find yourself using it over and over and not having to make a new pattern piece (Shabby Apple uses basically the same sleeve on A LOT of their dresses). This will mean an easier AND faster time. Since the Toe the Line dress is both straightforward and tricky at the same time I thought I would show you how I made the pattern for the back of the dress and you can get the general gist of how I do it. Honestly the front pieces took my a while to figure out but that is the fun of knocking off a dress! These dresses are gorgeous and if they were easy to make they wouldn't cost as much as they do or look as good. I would highly suggest going with something simple first like an easy wrap dress and then as your confidence grows branch out! If you begin with inexpensive muslin for the fabric you won't worry about waisting fabric and money and believe me you will learn a TON about sewing ha! If you would like to follow a long but have some concrete help you can now print out the Toe The Line Knockoff Pattern HERE. Or if you would just like to print it out and get a head start by cutting out your fabric there you go!
Using all those Measurements
If you haven't already you HAVE to have all your measurements taken before you start. Click HERE for a complete guise and handy printable table!
Now, since I have been doing this a while and know my body measurements pretty well I have moved on from muslin and just "go for it"unless the dress is particularly difficult. To be totally honest sometimes I just draw in chalk right on the fabric (as you will see below) The back of this dress is nice and straight forward which is great! If you own a Shabby Apple dress, or zoom in on the pictures you will notice that their dresses often use darts to create a beautiful silhouette, Toe The Line is no exception. Make sure to mark any darts you will make on your pattern. Just so you see what we are going for when I was done with my pattern piece it looked like this:
_MG_6018_6807
I started out by using my Back to waist measurement to draw a straight line. This would be the center of my back piece. This could also be considered the "fold" of the fabric. You really only have to draw everything on either one side or the other when you have a fold like this, but I did both in this just to be thorough.
howtopp1\
I then use my Back width to create a T across the top. This will be made into a nice dip shape later. I then use my shoulder length to create my shoulder lines.
howtopp2
You may need to measure from your top neck bone over to your shoulder blade so you know where to begin your shoulder line. (This would be another good measurement to write down).
howtopp2
Now I want to make a scoop neck in the back. Starting where the shoulder length begins I draw a nice slope down to meet the center back line. I then do the exact same arch on the other side.
howtopp3
Then I use half my waist measurement to draw a straight line across the bottom perpendicular to my center line. (I have no idea why only the typing showed up not the line).
howtopp4
I then take the measurement (which I totally should have included on the list) from right under my arm down to my waist. I prefer to do this straight down and then use darts to taper the fit. If you hate darts for some reason you could do it at an angle. I pictured it here with an angle just for simplification.
howtopp5
Now you are going to need to make your arm holes. This can be tricky when you are by yourself. I like to roughly measure the arch and then try to recreate the measurement. This is hard if you are by yourself. If you are by yourself use the measurement from the top of your shoulder to your under arm and add a generous amount for rounding and seaming.
howtopp6
Once I was done I transferred my pattern onto 8.5 X11 paper. I try to make sure to add a nice hefty seam allowance while doing this.
originaltoelineback
This is a rather sloppy one usually I try to do them nicely enough that if I HAD to I could leave it un-digital and people would still want to use it :) I try to make sure each sheet contains the name of the dress, the piece it is, where the fold is, cutting instructions and any darts, pleats etc.
Once digitized it will look like this:
(This is 3 pages merged together)
digitalback
But digitizing your pattern once you make it is for my next post!!!
Hope this was clearer then mud ha!
Related Posts Plugin for WordPress, Blogger...