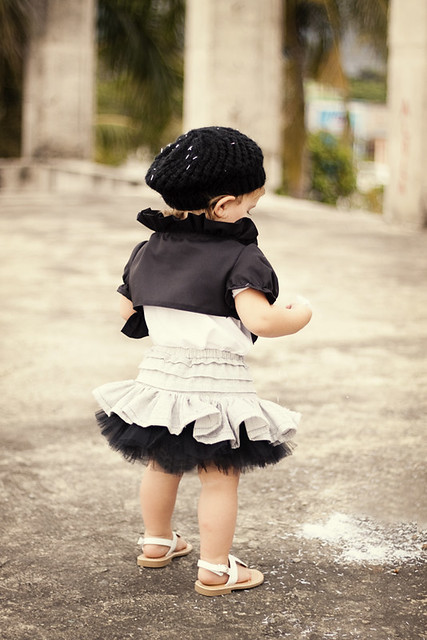
Today I will do the tutorial for the skirt.

It is sooo easy BUT it is one of those ones with out a set pattern. Believe me you can totally do this without a pattern! Seriously anything that has this much gathering is extremely forgiving.

Lets get sewing!
What you need:
1 yard main fabric
1/2 yard lining fabric
1/2 yard soft tulle
Small length of elastic
Sewing Machine
Scissors
First thing is first. Measure your cuties waist (or if you are like me just make an estimate ha!) Keep that number in mind as you cut. Now you are going to cut a rectangle out of your main fabric. I cut mine so it was 2.5 times the length of Evie's waste and about 8 inches long. Mine was a little longer because I tiered it. If you just want it to be plain on top make it a little shorter.
Once you have your rectangle cut make a large hem across the top.
Now we are going to cut our second rectangle. This one is going to be gathered. It should be as wide as your first but much longer. Since I was using a vintage mens shirt I had to cut several lengths and sew them together.
Once you have a nice long length of fabric hem up the bottom. Then sew a gathering stitch all the way across the top and gather it up. Gather until it is the same size as your top rectangle
Set these two pieces to the side.
Now you are going to cut the lining rectangle. This rectangle should be the same length but wider then the first. Especially when hemmed. Fold both rectangles in half, right sides together and sew up the sides but on the main fabric you will need to leave a little opening to feed the elastic through. You should have two "circles" now.
Once you have hemmed up the bottom grab your tulle. You are going to cut 3 strips. The first will be the widest with the second being an inch smaller and the third an inch smaller then that.
Take your thinnest piece of tulle. With the wrong side of the tulle facing you line up the raw edge of the tulle with the hem of your lining. (I did not hem mine and instead used my serger). Pin it all the way around then sew all the way around.
When you are done flip it down so that the tulle hangs down. Now topstitch what you just sewed.
Now we are going to attach the medium strip 1 inch up from your first tulle strip by doing basically the same thing. Lay the gathered strip of tulle in a straight line all the way around pinning as you go. Sew close to the edge all the way around. When you were done do the same thing and flip it down and topstitch around. Repeat this process 1 inch up again with your widest strip of tulle
Once you are done take your two main pieces and with the right sides together line up their raw edges
Take your lining and slide it up in the middle again lining up the raw edges. The tulle should be poking out the bottom.
Once you are done pull the tulle down where it is supposed to be. Now grab your elastic (it should be a little smaller then your cuties waste) attach a safety pin and feed it through your large hem.
Sew the ends of elastic together and let them slide back into the hem. Once you are done sew up the little opening. Trim up any uneven pieces of tulle and enjoy!!


Kelly this is so adorable! I'm dying to make one for Eden.
ReplyDeletexoxo-
Micalah
ohhh so cute! Thank you so much! I am in love with this skirt!
ReplyDeleteI am loving this! I will have to see if I can rig up a version for my niece! The flouce makes it!
ReplyDeleteNice work! -as usual =)
Thank you so much, I can't wait to get started!
ReplyDeleteSuch beautiful photos, beautiful little girl, and beautiful skirt! Thanks for sharing!
ReplyDeleteThis skirt is just too cute! I love every part of it. I'm going to have to hunt for a men's shirt to use 'cause I just love the pleats at the top, too. Racking my brain to figure out how I can replicate it from new fabric. Great great job! Can't wait to see what you come up with this week!
ReplyDeleteThank you, thank you, can't wait to make one!
ReplyDeleteYour daughter, photography, and sewing skills are always beautiful. Thanks for posting these tutorials!
ReplyDeleteIt's gorgeous!
ReplyDeleteAmazing! You are so talented. Your daughter is adorable - how do you pronounce her name (ee-v or ev-ee)? Just curious - love the name!
ReplyDeleteTHANK you for posting this!! I love, love, love it!!
ReplyDeleteSo amazing! You did an outstanding job! (as per ususal) and your photography is amazing!!!
ReplyDeleteGAHHH! I love this outfit so much and have been waiting for this tutorial since you first posted the outfit! <3
ReplyDeleteMay sound weird--- what do you think the measurements would be for an adult? 2.5 x the waist and..... 20 in?
ReplyDeleteplease tell me how you made that black cover for her top!!! it is the CUTEST!!
ReplyDeleteAm soooo glad you posted this tutorial! Will be fun using some of my husbands old dress shirts that have horrible ring around the collar. By the way, yours was the best entry and should have won.
ReplyDeleteLOVE IT!!!!
ReplyDeleteI also have a blog award that you can come grab if you want to participate :)
http://www.flutterbysandfrogs.com/2011/01/versatile-blogger-award.html
Ooooooooh, my little D might just need to have this made for her!
ReplyDeleteSo stinking cute!
Thanks for sharing.
What I'm wondering is if we can also get a tutorial for that gorgeous bollero that your little one is wearing. It's so cute and just what I've been looking to add to my little girl's closet. Btw, you're just inspiring. Thanks for giving hope to the rest of us.
ReplyDeletefound you via the challenge as I am a reader of Katy's.....Love your site.
ReplyDeleteI am going to try to make this for my 13 year old. If it turns out I will send you a picture...if not...we will never mention this comment again ;O)
It's so cute! i hope i'll make one for my 5 years old girl!
ReplyDeleteSooo cute!! I so want to make one fore my little girl.....Can you tell us how you did the tiering on top?
ReplyDeleteThanks for the tutorial...I just posted one that I made for my little girl. Yours came out better, but I am sure I will give it another try, because it is so darn cute.
ReplyDeleteThanks amy
What was the width and length of your widest piece of tulle?
ReplyDelete