(With the internet being awful the pictures aren't loading correctly) I am hoping it will magically heal itself over night ha!
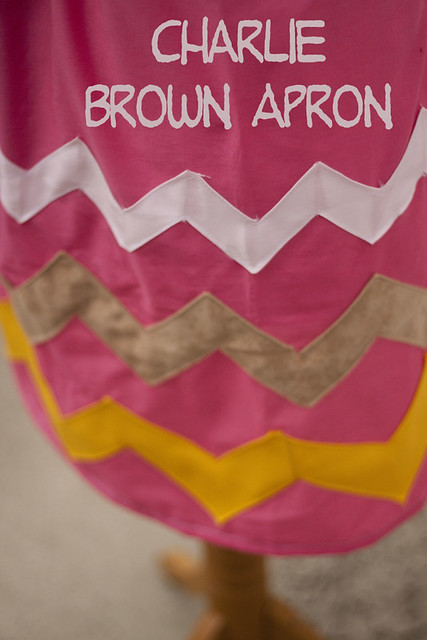
I am sooo in love with this apron!! I don't know if it is because midway through I literally thought I would be doing a post about how sometimes things just turn out horrible or what, thats probably it because while I was saying it was my fav my hubby said it was "cute" but not his fav :) I totally was ironing the chevron's thinking this is going to be awful. Which, when you have stayed up until midnight working on something is not the most fun thought. But oh my goodness I love how it turned out.
I love the unique neckline.
But what I really love is the chevrons on the skirt. While I didn't have the energy to make them perfect I think they turned out pretty cute and really make the apron. I learned how to make these in college but there is an excellent tutorial HERE (on an amazing blog).
Throw in the big brown waistband and I'm in heaven :) Now if only I had added pockets.
If you don't do the embellishments (or sew on ready made ones) this apron is incredible easy and quick to make!
What you need:
half yard of patterned fabric for the top
a long piece of fabric five inches wide and as long as your apron bottom
1 yard of fabric for your apron bottom
embellishments as you please
Sewing Machine
Scissors
Straight Pins
Once again you are going to make this apron with out a pattern. You just need to think logically about it and it is easy! Grab your yard of fabric (you will not use all of it). Hold it up to your lower waist. Mark how far down you want the apron to go. Do the same for how far around your waist you want it to go. Trim until you get a size you like. Once you have done this attach your embellishments.
Once they are all attached you are going to hem both sides and the bottom.
Now set this aside. Grab your patterned fabric. Cut rectangle as long as your torso (plus a little extra to make a pocket for the ribbon) and as wide as your apron.
Fold the piece of fabric in half. From the bottom raw edge cut a gradually angled line up to the top.
Once you have made your cut take your piece to the sewing machine. Hem up the two sides.
Now we are going to make a wide hem at the top where we will feed our "ribbon" through.
Once you are done grab your five inch wide piece of fabric and trim it until it is the same length as your apron top and bottom, with a little extra on the end where you will attach your ties. Lay the top part of your apron right sides together with the band you just created, lining up the raw edges. Pin together then sew along the raw edge. Unfold your piece and topstitch what you just sewed.
Now repeat this process on the other side of the band with your apron bottom
Almost done!!! All you have to do now is make your ties (in one of the several ways we have discussed this week) and attach one to each side. I did this by hemming over my band and folding the tie into the hem then sewing.
Now you have a choice, you can either make a long "ribbon" to feed through your neckline (I would recombined cutting a long piece of fabric, ironing over the raw edges, then fold over raw ends and iron, now iron the whole thing in half and sew down the edge, taddah!) or you can just use some pretty ribbon and fray check the ends. Either way grab your "ribbon" and attach a safety pin. Feed it through the top little pocket you made and bunch it up. Woo hoo! You are done! So very easy!


Yet another great apron! I want to make each one and don't know were to start! This has been a fun week seeing all the neat designs. Thanks so much, your blog is the first and only I look at in the morning. :)
ReplyDeleteAwesome apron! I'm loving the big zig zag stripes, and the gathered neckline too. I linked to your tutorial over at Craft Gossip Sewing:
ReplyDeletehttp://sewing.craftgossip.com/tutorial-charlie-brown-apron/2011/01/07/
--Anne
Thank you so much for the how to! I posted a link to this on my blog at http://www.flutterbysandfrogs.com/2011/01/january-1-7-round-up.html
ReplyDelete~blessings
Cammie
Absolutely adorable!
ReplyDeleteReally cute apron! And I love the name! Very fitting in the cutest way.
ReplyDeletehttp://shannonsews.blogspot.com
This is adorable! We will be featuring you on our blog ziggycrafts.blogspot.com Thanks for sharing.
ReplyDeleteI lOVE THIS... its so adorable =) I will make my own =)
ReplyDeleteTB
http://madebyheartbytb.blogspot.com/