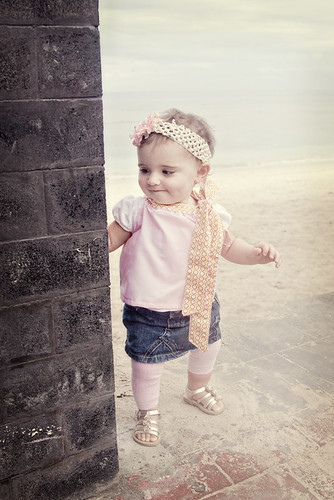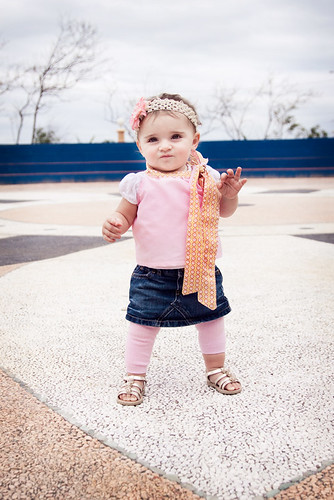
I am not a mom who likes dressing her baby like a baby aka a normal mom. I am one of those annoying moms who likes to dress her little boys like little men, in mini polos and cargo shorts and my baby girl in mini versions of clothes I would love to wear. When I am in the states I can usually find great outfits at H&M, GAP etc. but here in Timor I am having to make them up myself. I was a bit worried that this top might bother Genevieve, or that she would end up untying it, but surprisingly neither happened all afternoon. Again I used my "cute" fabric as sparingly as possible. This caused for a little extra work that you can probably avoid (and I will tell you how).
What you need:
Thread
Scissors
1/4 yard cute fabric
1/2 solid or corresponding fabric (you can switch these too if you like I just didn't have enough fabric for the main body portion)
Start by cutting two LONG strips of fabric. To conserve my cute fabric I cut up a rectangle I had into two long strips. I then took some of the main body fabric and did the same. I then sewed them together to make two LONG strips. This is going to be your neck and bow. (the four strips before I sewed them together)
Now if you have enough fabric, you simply need to make your strip extra wide. Then you can just fold it in half and press it in order to create your neck. I on the other hand put my "cute" piece right side to my main body strip and sewed up one side. When opened it looked like this:
Then I ironed the crease down to make a nice long strip with print on one side and pink on the other. I cut and ironed the ends into tips but you don't HAVE to do that. At this point one of your sides of the strip should still be raw
Now I took the same pattern piece that I used for my Fourth of July Tunic and cut two pieces of pink fabric
Placing right sides together sew up the sides (I went ahead and got out my serger since the local fabric I used was super light, you can always just do a tight zig zag stitch)
Once you have finished up the sides go a head and finish the armholes.
Next shirr up the tops of your dress, making sure to leave tails so that you can adjust.
Now, take the long strip that you created and fold it in half. I decided I wanted to keep a little extra on the edge. Lay down your strip right above your shirred top.
Use pins as markers to tell you where your shirred portion will stop and start. Do not pin the top to the strip, this is strictly used to mark. Turn your strip so that it is right sides together sew down the raw edge stopping and leaving a gap where your pins are, essentially creating a pocket to put your shirred top into. Now turn the strip right side out and press (I know it is tedious to stop and iron but I swear it makes sewing so much easier). Pin your shirred portion up into the corresponding pockets you made on the strip. (Remember that both sides are exactly the same so it doesn't really matter which one you pin where).
Your last step is to top stitch all the way around the top strip. I started on the bottom right so that I sewed across the shirred portion first then all the way across the top. Once you are done you can tied a nice big bow:
Again, I like this top because it is easy to get on and off Abby. I think I am going to make one in solid black, that will be pretty chic right?
Have fun deciding your own color scheme!
Cheers
Kelly
PS Evie's hair was sooo sticky, she gave her hair a milk bath at breakfast ;)


This is adorable! I just started getting into making little girl clothes (even though my little girl isn't due until September!), but I am totally going to try this!
ReplyDeleteSeriously, this is so adorable! Do you make them in adult sizes? hehe....
ReplyDeleteI'm the same with dressing my son. I only do little man clothes, so I really love all your designs!
You make the super pretties things in No mans land! Super inspirational!
ReplyDeletei cant sew to save my life! lol
cant wait to see more of your work!
XOXO
Keren
PS
I have lots of Vintage Images In greeting Cards and user Friendly DYI crafts..Hope you like!
wow!! what a story :) the baby clothes are ADORABLE! come on over and link up to MMM!!
ReplyDeleteKelly, every time you have a cute tutorial I show it to my friend that sews. So I can claim being responsible for at least one of your extra blog hits. The only thing that would bother me with this cute top is the length of the strips. Could they wrap around her neck? Yikes.
ReplyDeleteI ♥ your story! I'm so not kidding, this is so super adorable...actually all of your creations are great! So I have decied *psst with out my husbands ok* I need to have a little girl now....tee hee! Just Lovely! Keep it up Girly!
ReplyDeleteLove your story...your daughter is adorable and your sewing creations are so lovely!
ReplyDeleteJana
So cute! I loved hearing your story; I'm your newest follower!
ReplyDeleteFound you via UCreate. I have been following the situation in Timor since my university days when I first saw Manufacturing Consent! Love your story, love your blog. Blessings to you and your family.
ReplyDeleteYour blog is amazing! So glad I stumbled upon it!!! =)
ReplyDelete